Samstag, 15. Februar 2020

Haut ab, Ihr Schurken!

*** Dieser Post enthält Werbung. ***
*** This post contains advertisement. ***

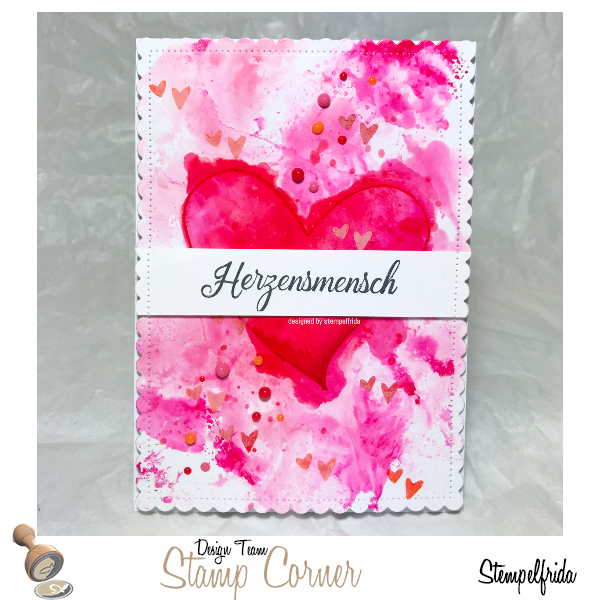
Auf den ersten Blick erkennt man es vielleicht nicht gleich, doch es handelt sich hier um eine Gute Besserungs-Karte :) Ja, der kleine Wikinger hier kämpft gegen diese wirklich fiesen Kameraden. Im Moment ist das ja leider ein sehr aktuelles Thema. Daher hoffen wir, dass er gaaaanz erfolgreich sein wird. 
You might not recognize it immediately, but this card is a get well card. Yes, the little viking here is fighting against some really nasty bugs! The text says "get out you bugs!". The word "bugs" here in German is a very medieval word for "guys". Sadly this is a very acute theme at the moment so we hope he will be very successful.


Heute starten wir bei bastel-traum mit einer neuen Challenge für Euch. Das Thema lautet dieses Mal "Gute Besserung". Hier geht es zum Blog (KLICK).
Today starts a new challenge on the bastel-traum blog for you. The theme is "get well" this time. This is the link to the blog (CLICK).


Meinen tapferen Kämpfer habe ich mit Ink on 3 gestempelt und mit Copics sowie Polychromos koloriert. Die kleinen Biester sind Alkohol Ink Tropfen, welche ich dann mit einem Stadtler Lumocolor Stift angemalt habe. Die Buchstaben habe ich aus weißem Karton gestanzt und dann entsprechend mit Copics und einem Sakuramarker in weiß angemalt. 

I stamped my brave fighter with Ink on 3 and coloured it with Copics and Polychromos. The little beasts are alcohol ink drops, which I painted with a Stadtler Lumocolor pen. I punched the letters from white cardboard and painted them with Copics and a Sakura marker in white. 

Materialliste
Supplies
Stempel / stamps: C. C. Designs Viking Kids CCD-0123
Stempelkissen / stamp pads: Ink on 3

Stanzen / dies: My Favourite Things MFT-752 Bottlecap Letters

Copics
0, 100, B91, B93, B95, YG91, YG95, YG99, W1, W3, W5, W7, RV11, RV34, R59, 
Hörner / horns: E40, E81, E84, 
Haare und Schurz / hair and trousers: E95, E07, E29, 
Gesicht / face: E51, E53, E55, E31, E11, E04, RV02 
Staedtler Lumocolor M, F
Polychromos 103, 132, 189, 190, 129, 125, 177, 267
Sakura weiß 1.0 
Copics Multiliner 0.7 
Alcohol Ink Ranger pesto, oregano, willow

An den folgenden Challenges möchte ich mit meiner Karte teilnehmen.
I would like to participate into the following challenges with my card.

Montag, 10. Februar 2020

Herzensmensch

*** Dieser Post enthält Werbung. ***
*** This post contains advertisement. ***

Herzensmensch - eines dieser wundervollen Worte, finde ich. Und da ja bald Valentinstag ist, kam es mir doch sehr gelegen, um es in eine wunderbare Herzkollage einzubetten. 
Human of the heart - one of those wonderful expressions, I think - at least in German it sounds wonderful :). And since Valentine's Day is coming up soon, it came in very handy to embed it in a wonderful heart collage.


Man kann mit Aquarellfarben herrliche Effekte auf Glossy Papier erzeugen. Das habe ich für meine Karte genutzt. Zunächst habe ich mir aus einem Stück Hilfspapier ein Herz ausgestanz. Das habe ich als Schablone über ein Stück glänzendes Fotopapier gelegt. Als Aquarellmarker habe ich Tombow Stifte benutzt, aber Ihr könnt auch andere Aquarellfarben dazu verwenden. Zwei Farbtöne habe ich auf eine Hilfsfolie gekritzelt und dann mit Wasser besprüht. Die Folie habe ich dann auf die Schablone gedrückt. Ich habe dann die Schablone enfernt und noch weitere Male diese Technik angewendet. Nach dem Trocknen habe ich das Herz mit den Tombows am Rand nachgezeichnet und ein paar Schatten zugefügt. Dann habe ich die kleinen Herzen im Hintergrund mit Distress Oxides gestempelt. Den Hintergrund habe ich mit einer Stanze in Form gestanzt, ebenso wie den gestempelten Textstreifen, den ich dann mit Abstandspads platziert habe. Zum Schluß habe ich noch Nuvo Drops auf der Karte verteilt.


You can create wonderful effects with watercolours on glossy paper. I used that for my card. First I punched out a heart from a piece of scrap paper. I put this as a stencil over a piece of glossy photo paper. As watercolour marker I used Tombow pens, but you can also use other watercolour media. I scribbled two shades of colour on an auxiliary foil and then sprayed them with water. Then I pressed the foil onto the stencil. I then removed the stencil and used this technique a few more times. After drying I drew the heart with the tombows at the edge and added some shadows. Then I stamped the little hearts in the background with Distress Oxides. I punched the background into shape with a die, as well as the stamped text strip, which I then placed with distance pads onto the background. Finally I added Nuvo Drops to the card.

Materialliste
Supplies
Stempel / stamps: SC-PS-0037, Herzensmensch
Stempelkissen / stamp pads: Ink on 3; Distress Oxides ripe presimmon, candied apple, black soot

Stanzen / dies: Sizzix Hearts, Tipsy

Tombow 856, 847
Nuvo Crystal Drops Gloss red berry, carnation pink, ripened pumpkin 

An den folgenden Challenges möchte ich mit meiner Karte teilnehmen.
I would like to participate into the following challenges with my card.

Samstag, 8. Februar 2020

You have a message

*** Dieser Post enthält Werbung. ***
*** This post contains advertisement. ***

Der neue Release von Visible Image ist echt so vielseitig. Erst vor ein paar Tagen habe ich Euch diese wunderschöne Blume mit dem berührenden Text dazu gezeigt und heute kommt direkt etwas Lustiges hinterher. Ich habe zwei der neuen Sets für meine Karte verwendet. Dem kleinen Kerl hat wohl jemand den Kopf verdreht!
The new release of Visible Image is really so versatile. Just a few days ago I showed you this beautiful flower with the touching text and today something funny comes right after. I used two of the new sets for my card. This little guy must be madly in love!


Begonnen habe ich mit meinem Mobiltelefon. Dieses habe ich mit Ink on 3 gestempelt und dann an den Rändern maskiert. Ich habe leichtes Klebeband genommen und dieses genau über die Ränder geklebt, damit ich mit meinen weiteren Stempeln nicht darüber stemple.

Dann habe ich das kleine Smiley gestempelt und ebenfalls maskiert. Die Maske habe ich mir aus einem Post It gebastelt. Dazu stempelt Ihr Euer Motiv auf das Post it dort wo es klebt und schneidet es möglichst genau aus. Dieses wird dann auf das Hauptmotiv geklebt, so dass man mit den anderen Stempeln nicht drüber stempelt. Dann habe ich das Knäuel aus dem Set Total Chaos über das Ganze gestempelt. Die Masken habe ich für meine Koloration des Bildschirms mit Copics belassen. Das könnt Ihr auf dem dritten Bild erkennen. Das Smiley habe ich dann auch noch koloriert und zum guten Schluß noch ein Schicht Glossy Accents auf meinem Mobiltelefon aufgetragen, so dass es möglichst echt ausschaut. 

Die Stempel, die ich für meinen Hintergrund benutzt habe sind auch Teil des Sets I´ve Got A Text. 

Auf meinen Fotos könnt Ihr übrigens erkennen, dass ich meine Blätter, die ich als Unterlage benutze immer sehr sehr lange benutze, hihihi. 

I started with the mobile phone. I stamped it with Ink on 3 and then masked the edges. I took some light tape and stuck it exactly over the edges, so that I don't stamp over them with my other stamps.

Then I stamped the little smiley and masked it too. I made the mask from a Post It. For this you stamp your motive on the Post It where it sticks and cut it out as exactly as possible. This is then glued on the main motif, so that you don't stamp over it with the other stamps. Then I stamped the scribble from the set Total Chaos over the whole thing. I left the masks for my colouring of the screen with copics. You can see that on the third picture. I also coloured the smiley and at the end I put a layer of Glossy Accents on my mobile phone, so that it looks as real as possible. 

The stamps I used for my background are also part of the set I've Got A Text.  

Well, you can also tell from my papers that I use as my stamping ground that I use them for a long long time, hehehe.


Materialliste
Supplies
Stempel / stamps: Visible Image Total Chaos, I´ve Got A Text 


Stempelkissen / stamp pads: Ink on 3; Distress Oxides candied apple
Copics 0, Y08, RV14, T2, YR07, R20, R35, R29, R59Glossy Accnts

An den folgenden Challenges möchte ich mit meiner Karte teilnehmen.
I would like to participate into the following challenges with my card.

Freitag, 7. Februar 2020

Affenzirkus

*** Dieser Post enthält Werbung. ***
*** This post contains advertisement. ***

Da laust mich doch der Affe bei dem ganzen Affenzirkus, hihihi. Also nicht mit mir! Dieser Affe macht´s richtig, oder? Am besten sollte er erst gar nicht groß mehr drüber nachdenken, sondern einfach sofort machen, was er gerne mag. Stempeln vielleicht? :)
Well, I'll be damned. I'll be damned. I am out! This monkey's doing it right, isn't he? He shouldn't think about it at all, but just do what he likes. Stamping, maybe? :) (I hope I get the translations ok. There is a saying in German, which does not translate to English about a monkey´s circus, which means a lot of engagement about nothing worth it. The second piece on the sign says "cleaning" and the third one "not with me / I am out")


Das süße Affenset mit einigen passenden Sprüchen und Bananen ist eines der neuen Stempelsets von Scrapbook Forever von diesem Monat. Die Außerirdischen hatte ich Euch ja schon gezeigt und das Schild gibt es auch. Ach ja, und da war ja auch noch das Set mit den Vögeln und den passenden Sprüchen über das Fliegen. 
The cute monkey set with some matching sayings and bananas is one of the new stamp sets from Scrapbook Forever from this month. I already showed you the aliens and the sign is also available. Oh yes, and there was also the set with the birds and the matching sayings about flying.  
 
Meinen Affen habe ich mit Ink on 3 gestempelt und mit Copics und Polychromos koloriert. Das Schild ist mit Memento in einem Braunton gestempelt und ebenfalls mit Copics koloriert. Den lila farbenen Hintergrund (den ich extra für Silke ausgesucht habe :)) ist mit meiner GellyPlate und Acrylfarben gestaltet. Dem weißen Papier unten habe ich mit einem Embossingfolder die Holzstruktur verliehen. Ich sollte viel öfter diese schönen Strukturen nutzen. 
Alle Teile habe ich von Hand ausgeschnitten. 
I stamped my monkey with Ink on 3 and coloured it with Copics and Polychromos. The sign is stamped with Memento in a brown tone and also coloured with Copics. The purple background (which I especially chose for Silke :)) is designed with my GellyPlate and acrylic colours. The white paper below is embossed with an embossing folder to give it the wood structure. I should use these beautiful structures much more often. I fuzzy cut all elements.


Materialliste
Supplies
Stempel / stamps: Scrapbook Forever Affenzirkus, Wegweise, Fledermäuse
Stempelkissen / stamp pads: Ink on 3; Memento rich cocoa

Prägefolder / embossing folder: Sizzix 662718 Lumber
Schablonen / stencils: Studio Light MASKMB05
Copics RV000, RV14, E00, E31, E04, E18, E37, E53, E79, YR27
Signomarker weiß
Polychromos 177, 180, 169, 131 
Nuvo Crystal Drops Gloss Crushed Grape


An den folgenden Challenges möchte ich mit meiner Karte teilnehmen.
I would like to participate into the following challenges with my card.

Donnerstag, 6. Februar 2020

Visible Wednesday - February Release: Thinking of You

*** Dieser Post enthält Werbung. ***
*** This post contains advertisement. ***

Ihr habt Euch vielleicht schon gefragt, wo denn mein Visible Wednesday geblieben ist gestern? Ich musste Euch leider auf heute vertrösten. Denn ich wollte Euch gerne etwas mit den brandneuen Stempeln von Visible Image zeigen, die Ihr derzeit vorbestellen könnt. Und ich verspreche Euch, dass ich dann auch noch eine weitere Karte in dieser Woche zeigen werde, ok?
Ihr kennt ja die wunderschöne Blume aus dem Creative Chaos Set, oder? Diese und einige weitere tolle Stempel gibt es jetzt in einem Geschwisterset, welches Total Chaos heißt. Und dass ist riesig! Klar wollte ich damit unbedingt eine Karte machen. Kombiniert habe ich sie mit diesen wunderschönen Textstempeln, die Helen von Visible Image entworfen hat. Sechs Stück gibt es davon in diesem Release. Sie enthalten immer eine Hauptnachricht etwas größer und dann einen weiteren Stempeln mit einem längeren Text passend dazu in verschiedenen Schriftarten.
 
You might have wondered where my Visible Wednesday was yesterday? Unfortunately I had to put you off until today. Because I wanted to show you something with the brand new stamps from Visible Image, which are currently in pre-order. And I promise you that I will show you another card this week, ok?
You know the beautiful flower from the Creative Chaos set, right? This and some more great stamps are now available in a sibling set called Total Chaos. And that's huge! Of course I really wanted to make a card with it. I combined them with these beautiful text stamps designed by Helen from Visible Image. There are six of them in this release. All of them contain a main message a bit bigger and then another stamp with a longer text in various fonts.


Zunächst habe ich die Blume mit Versamark auf ein Stück Aquarellkarton gestempelt und in weiß embosst. Dann habe ich mit Wasserfarben die Koloration gemacht. Die Texte habe ich mit Versafine auf Vellum gestempelt. Dieses habe ich möglichst straff über den Aquarellkarton gezogen. Den oberen Rand des Kartons habe ich kurvig geschnitten und die Kollage mit Pailetten versehen. Gemattet ist die Kollage auf braunem Karton.

First I stamped the flower with Versamark on a piece of watercolour cardboard and embossed it in white. Then I used watercolours to make the colouration. The texts I stamped with Versafine on vellum. This one I pulled as tight as possible over the watercolour cardboard. I cut the upper edge of the cardboard curvilinear and added sequins to the collage. I backed the collage with brwon card stock. 
 

Materialliste
Supplies
Stempel / stamps: Visible Image Total Chaos, Thinking of You 


Stempelkissen / stamp pads: Versamark; Versafine onyx black
Embossingpulver / embossing powder: Stampendous! detail white
Aquarellfarbe / water colour: HORADAM
Polychromos 177
 

An den folgenden Challenges möchte ich mit meiner Karte teilnehmen.
I would like to participate into the following challenges with my card.

Dienstag, 4. Februar 2020

Let go

*** Dieser Post enthält Werbung. ***
*** This post contains advertisement. ***

Im Feburar-Release von Scrapbook Forever ist ein Set zum Thema fliegen. Es enthält einige passende Sprüche sowie Vögel. 
The February release of Scrapbook Forever contains a set with the theme flying. There are some matching sentiments in it and bird silhouettes. This sentiment here says:"If you want to fly you need to let go what pulls you down."


Meinen Hintergrund habe ich mit Alkohol Inks gemacht. Nachdem sie gut getrocknet waren habe ich die Vögel darauf gestempelt. Der Hintergrund ist gemattet in zwei Farben und der Text vorn mit Abstandspads befestigt. 
I designed my background with alcohol inks. After it was dried well I stamped the birds on it. I matted it with two colours of cardstock. The text in the front is attached with spacer pads.


Materialliste
Supplies
Stempel / stamps: Scrapbook Forever Über den Wolken
Stempelkissen / stamp pads: Versafine onyx black; Archival faded jeans
Alcohol Ink Ranger cloudy blue, aqua, sailboat blue, denim


An den folgenden Challenges möchte ich mit meiner Karte teilnehmen.
I would like to participate into the following challenges with my card.

Montag, 3. Februar 2020

Du bist offiziell alt

*** Dieser Post enthält Werbung. ***
*** This post contains advertisement. ***

Ich hatte es ja bereits erwähnt, dass das Stempelset "Geburtstag 2" von Stamp Corner so coole Sprüche enthält. Natürlich muss ich noch weitere Karten damit machen. Die sind einfach zu lustig. Naja, wenn man ein bisschen schwarzen Humor hat zumindest :)
I had mentioned already that the stamp set "Geburtstag 2" from Stamp Corner contains so many cool sayings. So of course I needed to make another card with it. They are too funny. Well, at least if you have some kind of black humor. This sentiment says: Congratulations - You are old - officially!


Die Boote habe ich mit Ink on 3 gestempelt, ausgeschnitten und mit Copics koloriert. Um die Flammen habe ich mit einem weißen Sakuramarker weiße Pünktchen gemalt und mit einer dickeren Variante die Punkte unten auf der Karte. Für ein bisschen Tiefe ist alles mit Abstandspads übereinander angebracht.
I stamped the boats with Ink on 3, fussy-cut them and coloured them with Copics. I drew some small speckles around the flames with a Sakura pen. I used a bit thicker one for the dots on the bottom of my card. To gain some depth I attached everything with spacer pads on top of each other. 


Materialliste
Supplies
Stempel / stamps: Stamp Corner SC-PS-0050, SC-PS-0049
Stempelkissen / stamp pads: Ink on 3

Stanzen / dies: Create A Smile
Copics W1, Y06, Y08, YR07, R29, V04, V09, B01, B06, YG25
Sakura weiß 0.5, 1

An den folgenden Challenges möchte ich mit meiner Karte teilnehmen.
I would like to participate into the following challenges with my card.