Samstag, 31. Januar 2015

Zahn der Zeit - Gears

Ja, ja, der Zahn der Zeit. Heute habe ich eine Karte für Euch, die ich nach Vorgaben von drei Challenges gemacht habe.
Time flies! Today I have a card for you, which I designed following three challenges. 


Auf dem Bawion Blog heisst es in dieser Woche in der ABC Challenge Z wie Zahnräder. Der Casology Blog hat in der Challenge #131 dieser Woche das Thema Geburtstag und auf dem ColoursandSketches Blog gab es in der laufenden Challenge gleich zwei Vorgaben, nämlich einen Sketch und ein Farbschema.


The Bawion Blog has an ABC Challenge this week with the theme "Z wie Zahnräder", which means "Z as gear" :). Birthday is the theme in Challenge #131 on the Casology Blog. And finally, the current Challenge of the ColoursandSketches Blog asks for a scheme combined with a clolour scheme.  

Die folgenden Dinge habe ich zur Gestaltung meiner Karte benutzt. Außerdem Stempelpads von Adirondack in den Fargen Giner, Oregano und Espresso. Alphabet Hero Arts LL760 Good Alphabet, Message Inky Antiques 5027.
I have used the followeing tools and stamps and the stamp pads are from Adirondack (ginger, oregano, espresso). Alphabet Hero Arts LL760 Good Alphabet, Message Inky Antiques 5027.


Freitag, 30. Januar 2015

Less is more

Ja, da bin ich schon wieder :) Heute habe ich zur Abwechslung zu gestern mal wieder eine sehr schlichte Karte. Warum? Weil ich sie für drei Challenges gemacht habe, von denen die eine zu einem CAS Blog gehört, eine andere das Motto Clean and Simple - Alles geht bei der derzeitigen Challenge hat.
In contrast to yesterday, I would like to show you a plain card today, because I want to participate into three challenges with it, one of which belongs to a CAS blog and one of the other challenge´s theme this week is clean and simple - anything goes.


Die Challenge des Less is more CAS blog gibt diese Woche einem Sketch vor. Die Challenge des In{k}spire_me Blogs gab mir die Farben dazu :) ... alles so grün, hihi

Week 208 Sketch 14

The Less is more CAS blog has a sketch challenge this week, and on the In{k}spire_me Blog I found the colors for my card :) very green, hihi

In{k}spire_me Challenge # 183


Auf dem Addicted to stamps Challenge Blog gibt es in dieser Woche die Clean and simple challenge #129, für die ich meine Karte ebenfalls nominieren möchte.
The addicted to stamps blog has the Clean and simple challenge #129 running this week, for which I would also like to nominate my card.


Mit den folgenden Materialien habe ich gearbeitet (Marker und Stanzen von Stampin Up):
I have used the following tools (marker and puncher from Satmpin Up):
Paper Source Leaf Diamond 805825 and 805826
Vielleicht habt Ihr es bemerkt, witziger Weise haben sich die beiden Kreise mit ins Bild geschlichen, die habe ich nicht benutzt :) Nachdem ich die Stempel mit den Markern koloriert und abgestempelt hatte, habe ich das Bild noch per Hand nachgearbeitet um Strukturen zu geben und Akzente zu setzen.
Funnily the two circle punches sneaked into the picture, but I did not use those :) I first colored the stamps with the marker, stamped and then used the markers again to work out special effects on the stamped image.


Donnerstag, 29. Januar 2015

Libelle

Heute habe ich eine Libelle für Euch. Diesen Stempel von der Firma Magenta habe ich bereits sehr lange in meinem Sortiment und daher paßt er zum Retro Rubber Challenge Blog. Die Karte ist nach dem Sketch der derzeitigen Challenge dort entworfen. 
The current challenge on the Retro Rubber Challenge Blog is a sketch and I created this card following the rules (see sketch below and I used a very old stamp of a dragonfly from Magenta).


Nachdem ich die Libelle mit Memento in schwarz gestempelt hatte, habe ich sie zunächst mit Copics in den Farben B000, BG10, BG01, BG49, YG11, YG23 und G02 koloriert und dann Diamond Glaze aufgetragen, um einen glänzenden Effekt für die Flügel zu erzeugen. Der Hintergrund der Karte und der Querstreifen sind mit verschiedenen Stempeln in Blautönen (siehe Bild unten) gestaltet. Außerdem habe ich mit Gesso und Tip-Ex Marker Akzente gesetzt. Die Tag-Stanzen sind von MyFavoriteThings, hier habe ich Akzente mit Copic markern B32 und B97 gesetzt. Außerdem habe ich noch für die Ränder eine Stanze von Stampin Up und eine weitere von MyFavoriteThings benutzt, die ich Euch bereits in meinem Post Combine Three Calls gezeigt hatte. Das Clearstamp Set ist von der Firma Technique Tuesday.
First I stamped the dragonfly with Memento in black an colored it then with copic marker in B000, BG10, BG01, BG49, YG11, YG23 and G02. I used Diamond Glaze to create a shiny look of the wings and the eyes. For the background of the card and the stripe, I use various stamps and the stamp pads shown below. Special accents were set with Gesso and a Tip-Ex marker. The tags are made with dies from MyFavoriteThings as are the little curly edges (I showed the dies set in the post Combine three calls) and the clear stamp set is from Technique Tuesday. The edges on the left of the paper in the background are made with the punch on the picture from Stampin Up. Accents on the tags were taken with Copic marker B32 and B97.


So schaut der Sketch der Retro Rubber Challenge #6 aus:
This is how the sketch of the Retro Rubber Challenge #6 looks like:

Außerdem möchte ich die Karte für die Stempel-Magie Challenge #111 - Alles Geht einstellen. Hier ist der Link zum Blog: Stempel-Magie Blog.
In addition I would like to participate in the current Stempel-Magie Cahallenge #111 - Everything goes of the Stempel-Magie Blog.

Und noch für die derzeitige Challenge bei Seize the birthday, bei der es heißt "anything goes", Hauptsache Birthday :)
And in addition to the current Challenge at Seize the birthday, where they offer anything goes this week of course only in connection with Birthday!


Mittwoch, 28. Januar 2015

Happy Bot Day

Not only for boys is this CAS card, which I made for the current challenge on the CAS colors and sketches blog. I really like this retired set from Stampin Up and it is fun to not only make cards with flowers all the time, isn´t it?


This is how the sketch looks like, that I followed.

The stamp set I used is called Best Bots Forever and comes from Stampin Up. I used Stampin Up markers in the colors basic grey, bermuda bay and summer sun for the crosses. Copic marker C2, C4, C5 and BG05 were used by me for adding some color to the bot parts, which I stamped with Memento in black. The stencils are a set from Quikutz.


Montag, 26. Januar 2015

Combine three calls

This time I actually tried to combine three challenges for one card, a sketch, a color scheme and a technique. Maybe you can guess, what these were, when you have a look at the card. ... otherwise, of course the challenge details and the respective links to the challenges can be found underneath! The blogs providing the challenges are Stempelküche, Colorthrowdown, and CAS(E) this sketch. It was really fun to play along with you! Thank you for hosting the challenges! And in case you are searching for the heat embossing: The swirls on the top are heat embossed with white powder.


I used the following marker and stamp pads:
Copic Marker: YG11, BG93, 0, C-1, RV02
Stampin Up stamp pads: Gumball Green, Regal Rose

Stamps used are Fresh Fillers (SU, the little one on the picture), Swirls (SU, the big stamp), sentiment (Stampotique), animal (Eat Cake Graphics)

Dies: 11301 Circle on a line (Simon Says stamp), Borders2 DED104 (Paper Smooches)


Samstag, 24. Januar 2015

Far bigger in your heart - Welcome follower 13

I decided to make a one layer card for the January challenge at the Craft Stamper. Actually the topic is anything goes, but must include stamping, but still, I thought, that setting myself another hurdle would be fun. Also I wanted to create something "arty" without any other embellishments or cut out elements. Classical stamping so to speak! So you might be surprised about the card, because you did not see that I used this style very often with my cards on my blog so far. 

As you already know, I always welcome my new followers with a card and this one is dedicated to my follower number 13, which is Manuela. Welcome to my blog and thank you for your interest.


'Take A Stamp'
An 'Anything Goes' Challenge, but your entry MUST include stamping! 


The text stamp is from A very cool Tim Holtz clear stamp set and so is the die, which I used to cut the stencil for some of the background (it is called trellis). In addition I used a stamp from Hero Arts called wood finish. I do not know, where the girls stamps are from, if I remember correctly, I bought them at a fare in the Netherlands and do not remember the company any more, but I am sure, someone out there knows and can let me know, so that I can add the source here. The only thing I noted down in my album is SB812 for the one with the wings and B725.
Here are the ink pads and markers that I used for my art work.


Freitag, 23. Januar 2015

The voices talk only to me!


Meine liebe Jessi, erinnerst Du Dich noch daran..... wie wir unbedingt DIESEN STEMPEL haben mussten, weil er einfach so geil ist? Es gab ihn leider nur auf einer Stempelplatte mit anderen Stempeln, die wir alle nicht mochten, doch irgendwann kam der Stempel auch einzeln auf Holz montiert in Susi´s Regal und dann habe ich zugeschlagen. Ich finde ihn noch immer großartig und ich erinnere mich gerne an diese Anekdötchen, die wir zwei erlebt haben in unserer Stempelgeschichte.
Die Karte habe ich nach einem Sketch von My Favorite Things gewerkelt, der in dieser Woche die MFT Mittwochs-Challenge Sketch 212 darstellt. 

Dear Jessi, 
Do you remember our times at Susi´s Shop staring desperately at the rubber stamp plate that contained "The voices" as one of the stamps amongst others and we adored it so much, but did not want to buy the other stamps, that came along? How happy was I, when finally the stamp was available as a separate wood mounted stamp. I still love it and it is great to think about our funny events and experiences in our common stamp history :)
I made this card for the current challenge at my favorite things following the MFT Wednesday-Challenge Sketch 212.


Zur Gestaltung der Karte habe ich die Watercolor-auf-Fotopaier-Technik verwendet, die ich in dem Post Asian branch beschrieben und außerdem in dem Post You are in my heart bird verwendet habe. Beide Hintergründe sind mit dieser Technik hier gestaltet. Für den großen Hintergrund habe ich den rechteckigen Stempel dreimal untereinander verwendet. Natürlich habe ich auch Stanzen von My Favorite Things benutzt, die ich mir kürzlich erst bestellt hatte. Für den Einsatz hier haben sie sich super geeignet! 

For this card I used the water color on photo paper technique, which I described in the post Asian branch and also used for the card in the post You are in my heart bird for both of the backgrounds here. For the bigger one, I used the rectangle stamp three times. And surely I used my great brand new MFT dies set shown on the picture. It fits so well to the sketch and I look forward to creating more great pieces of art with it! In German we would say "My fingertips already tickle", but I am not sure, whether this translates to English as well :)


Donnerstag, 22. Januar 2015

Mein Gewinn von Anna´s Bastelglanz

Erinnert Ihr Euch noch an das Blog Candy bei Anna´s Bastelglanz? ............... 
zur Erinnerung: HIER hatte ich Euch darüber informiert, dass es tolle Preise zu ihrem 3. Stampin Up Jahr zu gewinnen gibt. Und.......

.........
ICH HABE DEN 1.PREIS GEWONNEN
!!!!!!!!!!!

Das ist der Hammer, guckt mal, in dieser Woche ist das Set angekommen, ist das nicht supertoll?????!!!!


Ein ganz großes DANKESCHÖN nochmals an Anna. Bald werde ich etwas mit diesem tollen Set basteln und es natürlich hier zeigen.

Mittwoch, 21. Januar 2015

Blog Candy at Copic Marker Europe

Wow, the Copic Marker Europe Blog celebrates 1500 follower with this great Candy (the bag, not the pens):


I would be happy to reach a three digit number for my followers here on the blog :) ... but let me tell you already, that there will be something to celebrate here as well in the near future... what can that be? Come back an see!


Grautöne - eine wahre Herausforderung und Wachskreide-Technik

Hallo Ihr lieben!
Die derzeitige inkspire-me-challenge-181 hat mich wirklich herausgefordert kann ich Euch sagen, denn das Thema war ein besonderes Farbschema. In der Regel habe ich damit nicht so große Probleme, aber diesmal handelte es sich für mich doch um Farben, die ich gern noch mit weiteren kombiniert hätte, aber das durfte ich ja nicht. Vorgegeben waren anthrazitgrau, schiefergrau, safrangelb und flüsterweiß. Das Farbschema könnt Ihr Euch unten in diesem Post auch anschauen. Hier ist erst einmal mein Beitrag.


Das Hauptmotiv der Karte habe ich mit einer speziellen Technik gemacht. Hierzu benötigt Ihr Wachskreiden und einen eher flächigen Stempel. Wachskreide ist trocken und kann daher nur mit einem Trick zum Stempeln genutzt werden. Dazu erhitzt Ihr Euren Stempel vorsichtig mit einem Heißluftfön (ich übernehme keinerlei Verantwortung und außerdem weiss ich nicht, ob Clearstamps dafür geeignet wären, das habe ich noch nicht ausprobiert!!!) und könnt dann die Wachskreide darauf verteilen. Nachdem Ihr zufrieden mit dem Farbauftrag seid, sprüht Ihr Wassernebel auf den Stempel und könnt ihn dann auf Papier oder Pappe abdrücken. Das tolle an dieser Technik ist einerseits, dass Ihr auch auf dunklem Karton arbeiten könnt und dass die Farbe ein tolles Relief zeigt. Meist ist der Auftrag so dick, dass Ihr auch noch einen zweiten Abdruck damit machen könnt. Die Blumen habe ich noch ein wenig mit schwarzen Punkten versehen und mit Glossy Accents mit Glanz versehen. Die Schmetterlinge sind mit einer Stanze von Stampin Up gestanzt, der Schriftzug ist von Artemio, Hintergrundstempel von Stampin Up und die Blumen sind von Penny Black. Die Punkte habe ich mit einem Kreidemarker von Stampin Up gezeichnet; grauweißes Band von Tschibo, gelbes Band aus stempelfrida´s Kramkiste :)


Dienstag, 20. Januar 2015

CAS in der Stempelküche

Na, fragt ihr Euch auch so manches mal, was denn die vielen Abkürzungen in der Bastelwelt so bedeuten? CAS könnte eine davon sein. Es handelt sich hier um "clean and simple". Dabei sind die Interprätationen und die Details die sich dahinter verbergen oftmals hier und dort unterschiedlich. Im heutigen Fall gab es eine Challenge bei der CAS Stempelkueche. Hier ist mein Beitrag dafür:


Bei der Stempelküche sind IMMER CAS Designs-gefragt und bei der derzeitigen Challenge#10 lautete das Thema

Da konnte ich mein Set Dino-Mite von Stampin Up mal zur Geltung bringen, denn ich brauchte noch eine Karte mit Dinosauriern. Die Stempel habe ich mit Markern von SU koloriert, die Farbwahl könnt Ihr dem Foto entnehmen.


Montag, 19. Januar 2015

Card in a box / Karte in der Box - Anleitung / how to

Wie ich es Euch versprochen hatte, zeige ich Euch heute die Anleitung zur Karte in der Box. Ich habe ein Exemplar gemacht, dass zu den Regeln der derzeitigen Challenge auf dem Colorthrowdown blog passt. Und nehme mit dieser Box daran teil. Die Box ist sehr einfach zu machen, hat einen tollen Wow-Effekt, kann aber flach wie eine Karte verschickt werden.

As promised, I am going to show you how to make a card in a box. I picked the colors so that I could participate into the current challenge of the colorthrowdown blog with it. The card is easy to make, has a great woah-effect and can be send flat as a card.


Dies ist die Herausforderung der Challenge. 
This is the color scheme for the challenge.
 
So schaut der Rohling aus. Auf dem zweiten Bild seht Ihr die Maße für ein Kartenstandardformat.
This is how the template looks like. You can see the measures on the second picture for a standard card size.

Schneidet das Papier wie auf dem folgenden Bild gezeigt und klebt es zu dem Halter zusammen, indem Ihr den rechten unteren Streifen mit Klebe verseht.
Cut the paper as shown on the picture and glue it to the box by adding glue to the little stripe on the bottom right.

Diese zwei Streifen (Gesamtlänge 7.5 cm, Länge der Mitte 5.25 cm, Höhe 2 cm) werden in die Box geklebt.
Glue these two strips (length 7.5 cm, middle part 5.25 cm, heigth 2 cm) into the box as shown on the picture.


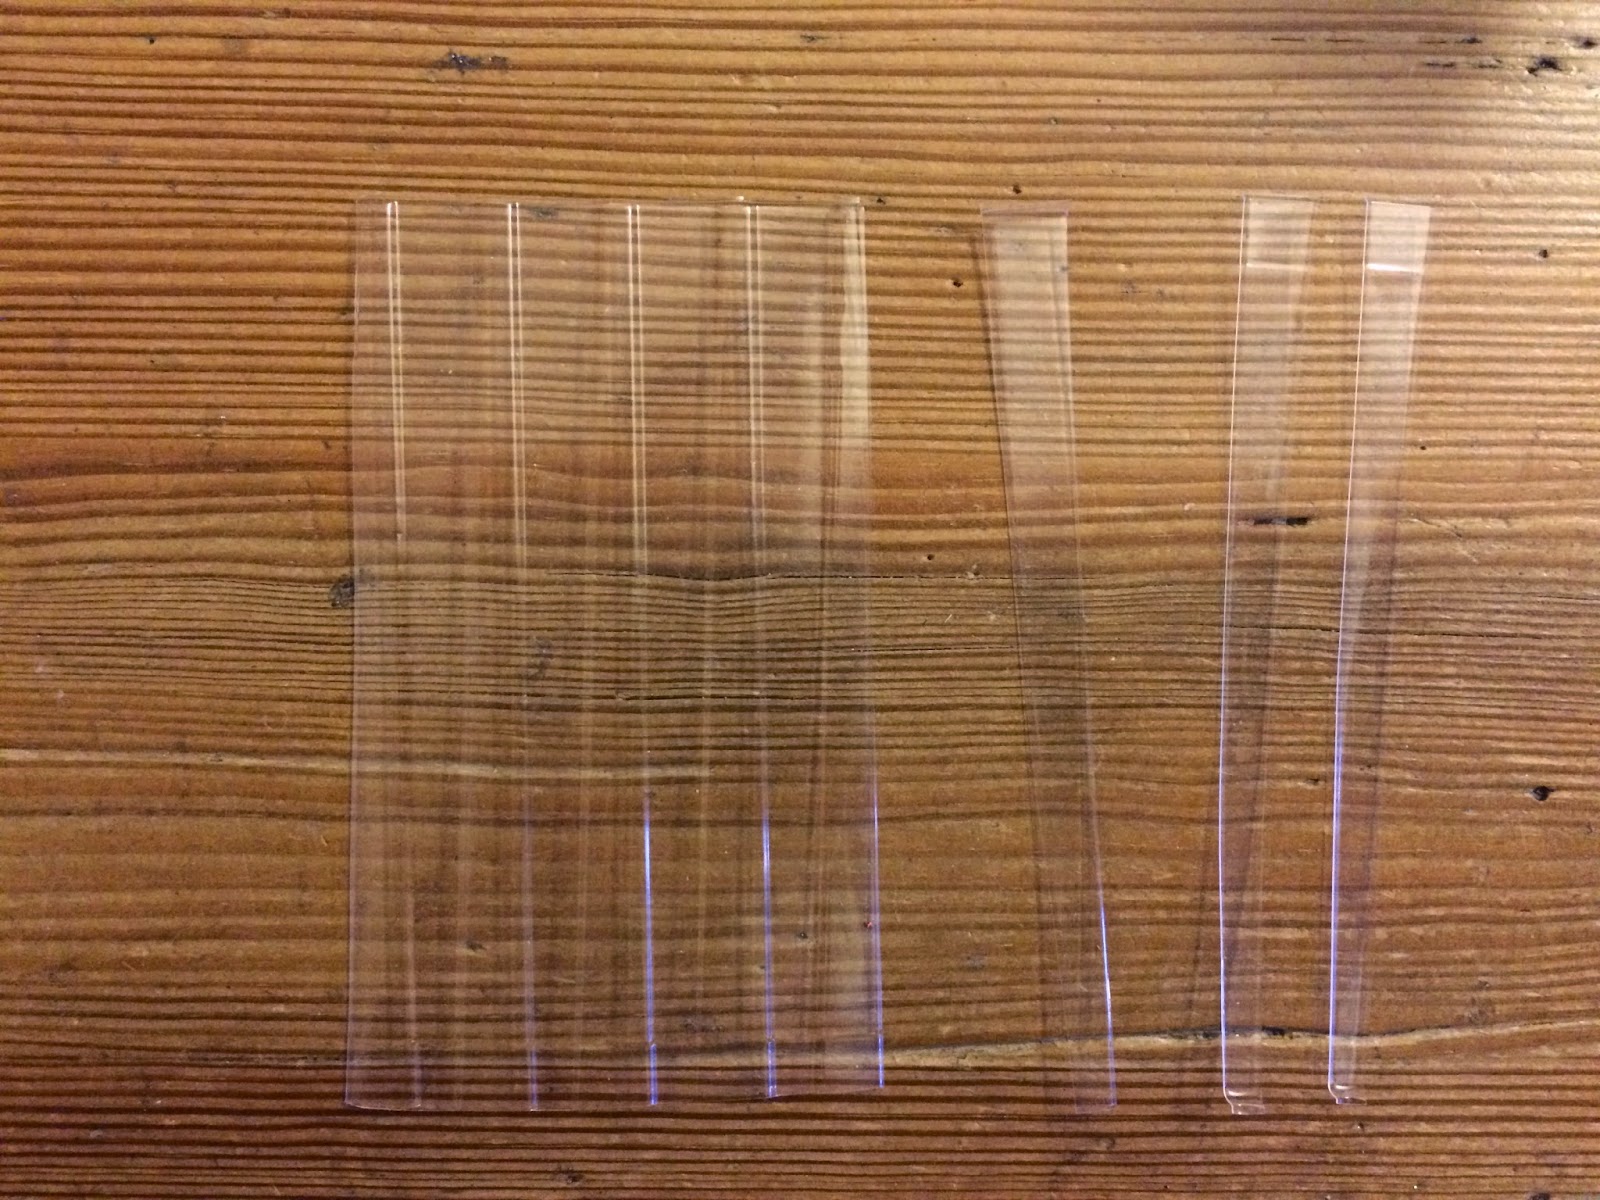
Für die Teile, die aus der Box ragen sollen benötigt Ihr durchsichtiges Plastik. Ich habe dafür beim ersten mal meinen Haushalt nach Verpackungen durchsucht und bin ich meinem Gemüsefach des Kühlschranks fündig geworden. Die Streifen habe ich von einer Paprikaschachtel geschnitten. Auf diese Streifen werden die Teile geklebt, die aus der Box herausragen sollen und die Streifen dann an die Halter im Inneren der Box geklebt. Beim Dekorieren der Box könnt Ihr Eurer Fantasie freien Lauf lassen. Möchtet Ihr die Box aber als Karte verschicken, müsst Ihr darauf achten, dass sie nicht zu hoch rausragen.

You will need stripes of color less plastic for the parts that are looking out of your box. When I made it the first time I scrolled through my fridge and found a box for bell pepper, from which I cut these parts. Glue the pieces of art that should look out of the box to those stripes and stick them to the inner part of the box. If you want to send the box in the standard format you will need to make sure, that the parts do not stick above the upper end of the box.


So schaut die box zugeklappt aus.
This is how the box looks folded.

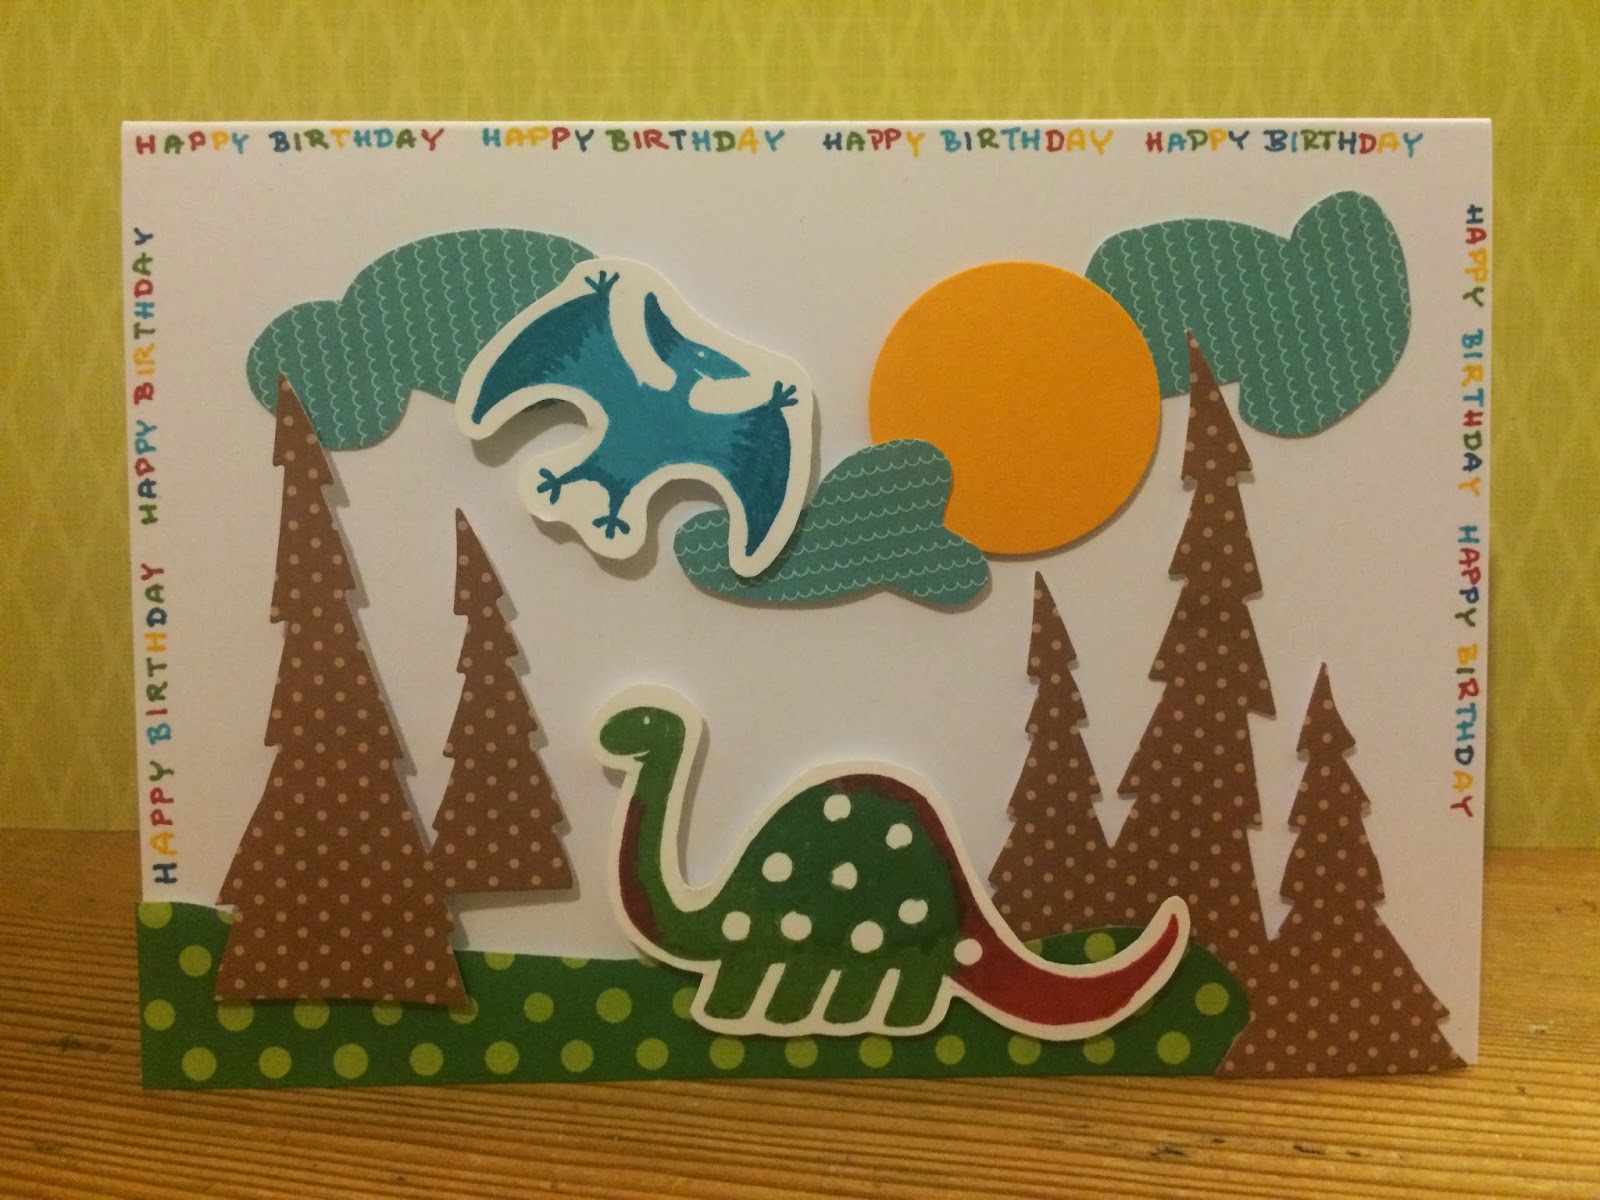
Für diese Box habe ich eines meiner Lieblings-Sets von Stampin Up benutzt (Birthday Banter). Die Teile habe ich mit Copics koloriert (C2, C4, C7, YR16, BG32, Y15).
I used this great stamp set from Stampin Up called birthday banter for the decoration of the box. The parts are colored using Copics (C2, C4, C7, YR16, BG32, Y15).