Mittwoch, 29. August 2018

Ein Hintergrund und drei Effekte - Teil 2 von 2

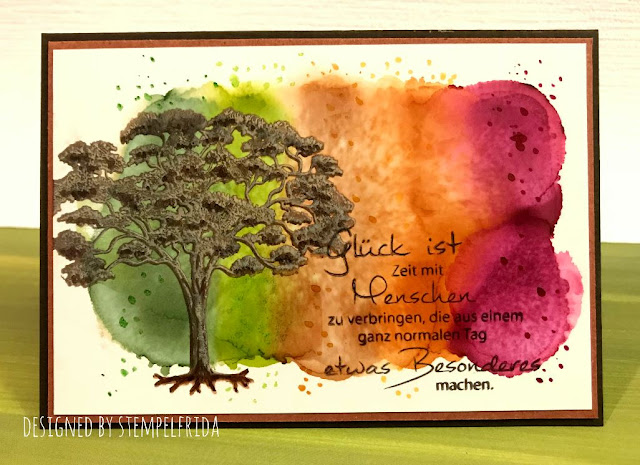
Kommen wir doch heute zum zweiten Teil des Hintergrunds, den ich Euch vorgestern gezeigt hatte. Ich hatte Euch ja versprochen, dass ich Euch noch von zwei weiteren Möglichkeiten für die Verwendung des Hintergrunds zeigen werde. Es handelt sich dabei nicht nur um einen weiteren Hintergrund, sondern auch um ein Hauptmotiv. Beides findet Ihr in meiner heutigen Karte wieder. 
Let us move on today to the second part of the background. I had promised you that I would show you two more ways to use the background, which I posted the day before yesterday. It is not only another background, but also a main motif. You can find both in my card today. 


Erinnert Ihr Euch? Ich hatte den flächigen Stempel mit Distress Oxides versehen. Was ich Euch im ersten Post noch nicht verraten hatte, war, dass ich bevor ich den Hintergrund abgestempelt hatte, den Baumstempel auf den flächigen Stempel gedrückt hatte. Diesen Baumstempel widerum habe ich dann auf weißes Papier gestempelt. Den Baum mit der schönen Farbschattierung seht Ihr als Hauptmotiv der heutigen Karte. Ich habe ihn ausgeschnitten und in den Vordergrund platziert. Den verbliebenen Hintergrundstempel hatte ich ja erst einmal für die erste Karte abgestempelt und dann noch mit Wasser besprüht. Ihr wisst ja, dass die Distress Inks mit Wasser reagieren. Den feuchten Stempel habe ich abermals abgedrückt. Er diente für diese Karte als Hintergrund. Um noch ein bisschen Strukturen zu erzeugen habe ich mit einer Stanze das Rautenmuster aus einem Karton gestanzt und diesen Karton als Schablone benutzt, um nochmal mit den gleichen Distress Oxide Farben über den Hintergrund zu tupfen. Unten links auf dem Hintergrund habe ich den Baum selber ein bisschen mit Farbe betupft und abgedrückt. Das Ganze habe ich mit verschieden dicken Abstandspads auf eine Korkschicht montiert.
Do you remember? I had inked the bold stamp with Distress Oxides. What I hadn't told you in the first post was that before I stamped the background I had pressed the tree stamp onto the bold stamp. I then stamped this tree stamp on white paper. The tree with the beautiful shade of colour is the main motif of today's card. I fuzzy cut it and put it into the front of the card. I used the background stamp then once for my first card and then I spritzed water on the remaining background stamp. You know, the Distress Inks react with water. I put the moist stamp on paper again. This stamped image served as the background for my card. To create some more structures I punched the diamond pattern out of a cardboard and used this cardboard as a stencil to apply the same Distress Oxide colours in a pattern on the background again. At the bottom left on the background I dabbed a bit of paint on the tree and stamped it. I mounted the whole thing on a cork layer with spacer pads of different thicknesses. The sentiment reads: "Look ahead and not backwards".

Wohoo, ich habe auch gesehen, dass ich zwei neue Follower habe. Da ich sie aber im Titel des Posts mit erwähnen möchte bei der Begrüßung, werde ich dies in einem der nächsten Posts machen.
Wohooo, I had seen that I have two new followers on my blog. I will welcome them in another one of the coming posts, since I want to mention them in the header and today´s header was so long already :)

Materialliste
Supplies
Stempel / stamps: Scrapbook Forever Bäume; Hampton Art Stamps 2238 Large Negative Plate
Stempelkissen / stamp pads: Distress Oxides wild honey, peeled paint, frayed burlap, black soot
Stanzen / dies: Sizzix 660220 Mixed Media
Nuvo Crystal Drops Gloss English Mustard

An den folgenden Challenges möchte ich mit meiner Karte teilnehmen.
I would like to participate into the following challenges with my card.

Dienstag, 28. August 2018

Mein Monat 2018-07

Jetzt geht es aber Schlag auf Schlag am Ende des Monats. Und ich will Euch doch auch noch meine Karten des Vormonats zeigen! Hier ist die Kollage.
Now there are so many things I have for you at the end of the month. And I also want to show you my cards of the previous month! Here's the collage.


Meinen absoluten Favoriten seht Ihr in der Mitte der Kollage. Mit dieser Karte habe ich die Juli TIMI Challenge des Craft Stampers gewonnen. Darauf bin ich sehr stolz. Ein Artikel ist ja schon online erschienen und in der November-Ausgabe werdet Ihr einen zweiseitigen Artikel dazu finden. Juchu!
My absolute favourite is the card in the middle. I won the Craft Stamper TIMI July challenge with it. And I am very proud of it. There already was an article online and you will find a two page story about the card and me in the November print issue of the Craft Stamper, yipieh!

Ich möchte meine Kollage bei Anna´s Art von Ingrid verlinken.
I would like to link my collage at Anna´s Art from Ingrid.


Herzlich Eure / Kind regards from

stempelfrida

Montag, 27. August 2018

Ein Hintergrund und drei Effekte - Teil 1 von zwei

Nachdem wir in den letzten Tagen viel mit Alkohol-Inks und Alkoholmarkern experimentiert haben, kommen heute nochmal die Distress Oxides ins Spiel. Der heutige Post ist Teil 1 von zweien. Ich möchte Euch zeigen, wie man mit einer Technik gleich mehrere Resultate bekommt.
After playing a lot with Alkohol-Inks and Alcohol marker in the past days, Distress Oxides come into the game again today. The post today is part 1 of two. I would like to show you how one can get several results with one technique. 


Ich habe einen uralten Flächenstempel, der am Rand die interessanten Kleckse hat. Man kann für diese Technik aber auch jeden anderen flächigen Stempel benutzen. Zunächst tupft Ihr Euch einen Farbverlauf auf diesen Flächenstempel und drückt ihn auf Euer Paper. Der Farbverlauf ist etwas strukturiert, was ein interessanter Hingucker für den kräftigen Baum ist. Auf diesen Hintergrund habe ich den Baum und meinen Spruch gestempelt. Es braucht gar nicht mehr Schnick-Schnack, finde ich. Eine schlichte Karte ist auch mal sehr schön und fokussiert auf das Motiv und den Spruch.
I have an ancient bold stamp, which has the interesting speckles at the edge. You can also use any other bold stamp for this technique. First, dab a colour gradient onto this stamp and press it onto your paper. The colour gradient is somewhat structured, which is an interesting eye-catcher behind the strong tree. On this background I stamped the tree and my saying. It doesn't need any more frills, I think. A simple card is also sometimes very beautiful and focusses on the motif and the saying. The sentiment reads: "Love what you do".
An einem der kommenden Tage werde ich Euch zu dieser Technik noch verraten, wie Ihr zu weiteren schönen Resultaten kommen könnt. Bis die Tage also!
In one of the next days I will tell you more about this technique. How you can get even more beautiful results. See you soon!


Materialliste
Supplies
Stempel / stamps: Scrapbook Forever Bäume; Hampton Art Stamps 2238 Large Negative Plate
Stempelkissen / stamp pads: Distress Oxides wild honey, peeled paint, frayed burlap, ground espresso, black soot

An den folgenden Challenges möchte ich mit meiner Karte teilnehmen.
I would like to participate into the following challenges with my card.

Samstag, 25. August 2018

Distress Oxides in Distress Ink on Glossy paper

Für meine zweite Karte im Scrapbook Forever Designteam habe ich das Bäumeset genommen. Es enthält verschiedene Bäume und Sprüche.
I took the Bäume set from Scrapbook Forever for my second card in the design team. It contains several trees and sentiments.


Der Hintergrund ist mit Alkohol-Inks auf Glossy-Papier gestaltet. Anschließend habe ich mit passenden Copic Markern die Flecken zugefügt. Beim Baum  habe ich ein wenig experimentiert. Um die Strukturen zu bekommen habe ich zunächst mit Distress Ink und anschließend mit dem gleichen Farbton Distress Oxide gestempelt. Die beiden verschiedenen Konsistenzen geben einen tollen Effekt ineinander auf dem Glossypapier. Auch hier habe ich mit Copics Akzente gesetzt um noch mehr Strukturen zu erzeugen und den Baum noch mit Wurzeln zu versehen.
I used alcohol inks to design the background and used matching Copic colours to draw the speckles. The tree came with some experimentation. I first stamped it with Distress Ink and then with Distress Oxides in the same colour. The combination of the two different materials give a next texture effect on the glossy paper. I stressed the structures a bit more by adding shades with Copics and also added roots to the tree. The sentiment reads: "Luck is to spent time with people, who turn a normal day into spmething special".


Materialliste
Supplies
Stempel / stamps: Scrapbook Forever Bäume
Stempelkissen / stamp pads: Memento tuxedo black; Distress Ink walnut stain; Distress Oxides walnut stain
Copics YG67, RV69, E37, E47, E49, YR14
Tria Letraset 370
Alkohol Inks Adirondack meadow, lettuce, caramel, raisin

An den folgenden Challenges möchte ich mit meiner Karte teilnehmen.
I would like to participate into the following challenges with my card.

Freitag, 24. August 2018

Bright jelly fish

Ihr kennt das, gell? Ihr seht eine Farbkombination und sie packt Euch direkt. So erging es mir mit der derzeitigen Challenge von Sunday Stamps. Am Ende des Posts seht Ihr das Inspirationsbild mit den gewählten Farben. So cool, oder? Da musste eine Karte her. .... auch wenn ich grade ganz viel auf dem Tisch habe und Ihr daher regelrecht mit Posts überschwemmt werdet.
You know that, right? You see a colour combinations and you are flashed. This happened to me when I saw the colours of the current Sunday Stamps challenge. You can see the inspiration picture with the colour choice at the end of my post. So cool, he? I really needed to put that on a card! .... even though I do have a lot on my desk currently and you are being flooded with posts kind of.

Diese Karte ist wirklich etwas Besonderes, denn ich habe den Hintergrund mit Brushos gestaltet und dann mit Folie beklebt. So ist er herrlich glänzend, das kann man leider nicht ganz so gut erkennen. Bevor ich die Folie aufgezogen habe, habe ich noch die Bläschen in einem glitzernden Embossingpulver gemacht und Akzente mit dem Signo Marker gesetzt. Ich will ehrlich sein, die Idee mit der Folie war aus der Not entstanden. Denn ich hatte so viel Brushos benutzt, dass der Hintergrund total abfärbte (leider habe ich  mir auch damit den ersten bereits kolorierten Fisch versaut). Da es schon spät war und ich nicht mehr mit Lack sprühen wollte, kam mir die Idee mit der uralten Folie, die ich noch hatte. Das hat wunderbar geklappt und sieht toll aus. Das werde ich definitiv nochmal benutzen.

This card is indeed something special, since I created the background with Brushos and then covered it with foil. So it is really shiny, which sadly one can not see so well from the pictures. Before I added the foil I made the bubbles with glimmer mebossing powder and added some highlights with my Signo marker. I want to be honest with you, the idea with the foil only was a necessity. I actually had used so much Brushos that the background was terribly staining. It was late already so I did not want to use spray any more and then I had the idea with the foil which I still had for ages already. It worked so nicely and looks so cool. I will definitely use it again. 


Ist er nicht super cool, dieser herrlich leuchtende Quallenfisch?
Isn´t he super cool this great bright jelly fish?

Materialliste
Supplies
Stempel / stamps: Create A Smile - Strahlende Küste, Hey, Quatschkopf
Stempelkissen / stamp pads: Memento tuxedo black; Versamark
Stanzen / dies: My Favourite Things MFT-1111 Ocean Waves
Embossingpulver / embossing powder: Sparkle N Sprinkle Tequila Sunrise
Copics Y13, Y08, B00, YR04, YR07, R08
Brusho PRUSSIAN BLUE; ULTRA MARINE; OST: BLUE
Klebefolie / sticky foil
Glossy Accents 

An den folgenden Challenges möchte ich mit meiner Karte teilnehmen.
I would like to participate into the following challenges with my card.

Donnerstag, 23. August 2018

Sweet Orca - Debut at Scrapbook Forever

Hallo meine Lieben!
Hach, ich freue mich riesig, denn Silke von Scrapbook Forever hat mich gefragt, ob ich in ihrem Designteam mitmachen möchte. Und ob ich das möchte! Heute zeige ich Euch meine erste Karte mit dem Wal aus dem neuen Set Winterpost. 
Hello my dear readers!
I am really happy, because Silke from Scrapbook Forever asked me if I would like to join her design team. Of course I do! Today I show you my first card with the whale from the new set Winterpost. 


Während ich auf den Süßen gewartet habe, habe ich schon mal den Hintergrund für ihn mit Copic Refillern gestaltet. Ich wollte ihm ja ein schönes Plätzchen bieten, damit er sich wohl fühlt. Den weißen Karton habe ich mit einem Fenster, Nuvo Drops und dem Spruch aus dem Set Bäume versehen. Er ist mit Abstandshaltern montiert, um Tiefe zu gewinnen. Den kleinen Freund habe ich tatsächlich nach dem Stempeln diesmal zuerst ausgeschnitten und erst danach mit Copic Markern koloriert. Er ist ebenfalls mit Abstandspads auf dem weißen Karton montiert.


While I waited for the sweet one, I already created the background for him with Copic Refillers. I wanted to offer him a nice place to feel comfortable. I added a window, Nuvo Drops and the sentiment from the set trees to the white cardstock. It is mounted with spacers to gain depth. I actually first cut out the little friend after stamping and only coloured it afterwards with Copic markers. It is also mounted with distance pads on the white cardboard. The sentiment reads: "Look ahead and not backwards!"


Materialliste
Supplies
Stempel / stamps: Scrapbook Forever Winterpost, Bäume
Stempelkissen / stamp pads: Memento tuxedo black

Copics 100, C0, C2, C4, C5, C8
Copic Refiller
Copic Multiliner 0.1
Nuvo Jewel Drops key lime, Nuvo Crystal Drops caribbean ocean

An den folgenden Challenges möchte ich mit meiner Karte teilnehmen.
I would like to participate into the following challenges with my card.

Montag, 20. August 2018

Acorns


Am Wochenende waren wir ein wenig in der Natur unterwegs. Dafür brauche ich bei mir nicht weit zu gehen, denn sie fängt direkt vor meiner Haustür an. Habt Ihr auch bemerkt, wie viele Eicheln es in diesem Jahr gibt? Davon sind auch schon einige bei uns runter gefallen und ich habe mir einen Zweig mit zwei Eicheln aufgehoben und angeschaut. Das sind schon hübsche Früchte, finde ich.  Schade, dass sie das satte grün so schnell verlieren.
Eicheln sind auch das Thema meiner heutigen Karte, aber die Farbgebung ist eher flashy.
At the weekend we have been out in the nature. I don't have to go far, because nature starts right at my front door and also at the back door, hihi. Have you also noticed how many acorns there are this year? Some of them have fallen down already and I picked up a branch with two acorns and looked at it in more detail. That's a pretty fruit, I think. Such a pity that they loose their nice fresh green colour so quickly.
Acorns are also the subject of my card today, but the coloring is rather flashy.


Als Hintergrund habe ich ein Stück weißes Papier genommen, welches ich mit Alkoholink Nachfüllern koloriert hatte. Ich hatte den Effekt auf verschiedenen Papieren getestet und dieses war ein Papier mit nicht glänzender Oberfläche. Es ist so erstaunlich, wie unterschiedlich die Wirkung oft ist, je nach dem, welches Papier man benutzt. Die Eicheln sind eine Stanze von Alexandra Renke und ich habe sie mit Copic Markern koloriert. Auf der Karte habe ich auch einige Überbleibsel von anderen Karten verwendet, ein paar Stanzteile zum Beispiel. Desweiteren habe ich einen uralten Stempel von Hero Arts für das Label verwendet. Den habe ich bereits mindestens 7 Jahre und ich glaube, ich habe ihn bislang noch nie verwendet. Das wurde aber auch Zeit!
As background I took a piece of white paper, which I had coloured with Alcoholink refillers. I had tested the effect on different papers and this was a paper with a non-glossy surface. It is so amazing how the effect varies depending on the paper you use. The acorns are a die cut from Alexandra Renke and I coloured them with Copics. On the card I also used some remnants of other cards, some die cut parts for example. Furthermore I used an ancient stamp of Hero Arts for the label. I've had it for at least 7 years and I don't think I've ever used it before. It was about time!
 

Materialliste
Supplies
Stempel / stamps: Hero Arts CL046 Friendship Messages
Stempelkissen / stamp pads: Distress Oxides Peacock feathers
Stanzen / dies: Alexandra Renke KbD-AR-FI0007 Beeren &Samen, KbD-AR-FI0008 Steck-Kranz-Stanze; Sizzix 655819; EK Success
Nuvo Glitter Drops Blue Lagoon, Crystal Drops Gloss Simply White, Crystal Drops Gloss Midnight Blue
Copics YG17, YG21, YG23, B04, B39, BG49 and further colours of Refillers

An den folgenden Challenges möchte ich mit meiner Karte teilnehmen.
I would like to participate into the following challenges with my card.

Freitag, 17. August 2018

TIMI winner of the July Craft Stamper Challenge

Meine lieben Leserinnen und Leser!


Heute habe ich etwas Besonderes für Euch. Bei der Juli-Challenge des Craft Stampers ist meine Karte zum Gewinner gewählt worden. Daher ist heute ein Post auf dem Craft Stamper Blog mit dem TIMI (Take It Make It) Gewinner Profil über mich erschienen. Ich bin schon sehr stolz :)
Hier findet Ihr den Artikel:
Craft Stamper Magazine Blog

My dear readers!
Today I have something special for you. My card for the July challenge of the Craft Stamper was chosen to be the winner. Today there is a post on the Craft Stamper blog with the TIMI (Take It Make It) winner profile about me. I am so very proud :)
You find the article here: 
Craft Stamper Magazine Blog

Ganz herzlichen Dank! / Thank you so much!
Eure / Yours 
stempelfrida  

Mittwoch, 15. August 2018

Light house for Conny

Habt Ihr auch Feunde, die weit weg wohnen? Für meine liebe Freundin Conny habe ich diese Karte gemacht. Wir sehen uns nur sehr selten, aber die Freundschaft besteht - Zeit, Distanz - egal!
Do you also have friends, who live far apart? I made this card for my dear friend Conny. We only meet rarely, but the friendship survives - time, distance - doesn't matter!


Geliebt und gehasst - Stempelsets der Firma Stampin Up! Ich habe mir mal wieder eines gegönnt. Und ich glaube, ich habe hier auch schon lange nichts mehr mit Stampin Up Stempeln gezeigt. Das sei nun nachgeholt. Es handelt sich um ein -wie ich finde- wunderschönes Set zum Thema Gezeiten / See. Ich denke, ich werde es wohl in Zukunft noch öfter benutzen.
Der Leuchtturm ist ein Zwei-Schritt-Stempel, bei dem man zunächst in der helleren Farbe stempelt und dann mit einer dunkleren Farbe die Details und den Schatten stempelt. Das Wasser habe ich in mehreren Schritten nebeneinander gesetzt und dabei das Gras und den Leuchtturm mit Post-it abgeklebt. Nach dem Stempeln mit Distress Oxides habe ich mit Polychromos Details koloriert. Der Spruch ist übrigens von Create A Smile.
Beloved and hated - stamp sets from Stampin Up! I allowed myself to get a new set. And I don't think I've shown anything here with Stampin Up stamps for a long time now. I will make up for it now. It is -in my opinion- a wonderful set about tides / sea. I think I'll use it more often in the future.The lighthouse is a two-step stamp. You stamp the light house in the lighter ink first and then stamp the details and the shadow with a darker ink. For the ocean I stamped with the respective stamp several times and protected the grass and the light house with Post-It paper. After stamping with Distress Oxides I coloured details with Polychromos. The saying is by the way from Create A Smile

Materialliste
Supplies
Stempel / stamps:Stampin Up Durch die Gezeiten; Create A Smile bis zum Mond
Stempelkissen / stamp pads: Distress Oxides barn door, ground espresso, moved lawn, broken china, aged mahogani
Polychromos

An den folgenden Challenges möchte ich mit meiner Karte teilnehmen.
I would like to participate into the following challenges with my card.

Montag, 13. August 2018

Regenbogenquallen

Kennt Ihr schon die neu entdeckte Art von Quallen? Es handelt sich dabei um Regenbogenquallen aus der Gattung der Sonnenscheingeschöpfe :)
Do you know the newly discovered kind of jellyfish? These are rainbow jellyfish from the genus of sunshine creatures :)


Von meiner lieben Freundin Jessi hatte ichnachträglich zum Geburtstag noch das süße Stempelset von Create A Smile, welches sich auf meiner Wunschliste befand, bekommen. Ganz lieben Dank nochmals! Ich musste es direkt einweihen. .... Und so sind die fröhlichen Quallen (irgendwie habe ich in den letzten Wochen einen Hang zu Quallen, hihi) das Hauptobjekt meiner heutigen Karte geworden. Ich fand den Sketch der Freshly Made Sketches Challenge zu verlockend. Noch dazu kam, dass Create A Smile derzeit auf der FB Seite das Thema Regenbogen hat. Und warum dann nicht auch mal den Regenbogen hinein ins Wasser bringen? Und statt zweier Gesellen habe ich gleich noch ein paar mehr dazu gemacht. So ist das Thema der Uniko Challenge auch direkt mehrfach erfüllt (nun ja, das Wort Geburtstag habe ich dann auch gleich zweimal angebracht, weil es so schön ist und für ein Kind eignet sich diese farbenfrohe Karte ja wohl auch). 
Gestempelt habe ich mit Memento und Distress Oxides. Koloriert mit Copic Markern. Ich wollte das fehlende lila aus dem Regenbogen nutzen, um damit die Schatten im Wasser zu zeichnen. Macht sich doch gut, oder? Die ausgestanzten Worte habe ich ebenfalls mit Copics angemalt. Sie sind jeweils zweimal ausgestanzt und dann das schwarze Wort etwas versetzt hinter das kolorierte geklebt.
From my dear friend Jessi I had received the sweet stamp set of Create A Smile, which was on my wish list, for my birthday. Many thanks again! I had to use it immediately. .... And so the happy jellyfish (somehow I have a tendency to jellyfish in the last weeks, hihi) have become the main object of today's card. I found the sketch of the Freshly Made Sketches Challenge too tempting. In addition, Create A Smile currently has the topic rainbow on the FB page. And why not put the rainbow into the water? And instead of two journeymen, I added a few more. So the theme of the Uniko Challenge is directly fulfilled several times (well, I put the word birthday twice, because it is so beautiful and for a child this colorful card is probably also very suitable).
I stamped with Memento and Distress Oxides, coloured with Copic markers. I wanted to use the missing purple from the rainbow to draw the shadows in the water. It's cool, isn't it? I also coloured the die cut words with Copics. For each of them I cut out the word twice and mounted the coloured one a bit to the side of the black one. 


Materialliste
Supplies
Stempel / stamps: Create A Smile Strahelnde Küste
Stempelkissen / stamp pads: Memento tuxedo black; Distress Oxide Candied apple, carved pumkin, squeezed lemonade, twisted citron, mermaid lagoon
Stanzen / dies: Create A Smile Cool cuts

Copics B01, B04, B16, B39, BV0000, B00, V17, R05,0R29, R08, R59, YG00, YG25, YG17, YR04, YR07, Y13, Y08, Y17
Signo Marker white

An den folgenden Challenges möchte ich mit meiner Karte teilnehmen.
I would like to participate into the following challenges with my card.

Donnerstag, 9. August 2018

Glücksmoment

Heute bringe ich Zigzack, Fell, Washitape und Hurra! zusammen :) ... Ihr kennt meine Leidenschaft ab und zu mehrere Challenge-Themen zu kombinieren. Herausgekommen ist diese Glücksmomentkarte mit der süßen Ratte von A Capella, die ich mir beim Frühlingsmedina gekauft, aber noch nicht benutzt hatte.
Today I bring chevron, fur, washi tape and hooray! together :) .... You know my paasion to once in a while combine various challenge themes. It ended up in this lucky moment card with the cute rat from A Capella, which I got myself at the Spring Medina this year. I had not used it yet, it was about time!


Die herrliche Stanze-Stempelkombination von Charlie und Paulchen (Glücksmoment und andere Glücksworte) hatte ich von meiner lieben Freundin Martina zum Geburtstag bekommen. Nochmals ganz lieben Dank dafür! 

I got this gorgeous stamp-die-combination-set from Charlie and Paulchen (the sentiment says lucky moment and there are other words with lcuk in it) from my dear friend Martina for my birthday. Again, thank you so much! 
 

Die Ratte habe ich mit Memento gestempelt und mit einer Kombination aus Copics und Polychromos koloriert. Die Nase und das Objektiv vom Fotoapparat habe ich mit einer Schicht aus Glossy Accents überzogen. Auch die herrliche Randstanze ist von Charlie und Paulchen. Ich hatte sie Euch ja bereits auf der Arche Noah Karte in der größeren Variante vorgestellt. Hier habe ich die Ränder zusätzlich koloriert.

I stamped the rat with Memento and coloured it with a combination of Copics and Polychromos. I added Glossy Accents to the nose and the ocular of the camera. The nice edge die is from Charlie and Paulchen as well and I introduced it to you in the bigger version already in my Arche Noah card. For the card today I accentuated it with Polychromos.
 
Auch auf dem Text findet ihr das Glossy Accent wieder und im Hintergrund sind Sterne aus einem total vielseitigen Stemeplset von Winnie&Walter
You also find Glossy Accents on the word. The stars in the background are from a very versatile stamp set from Winnie&Walter.


Materialliste
Supplies
Stempel / stamps: A Capella, Charlie und Paulchen, Winnie & Walter Scenery: Big Bang Confetti
Stempelkissen / stamp pads: Memento tuxedo black, Distress Oxides moved lawn, twisted citron
Stanzen / dies: Charlie und Paulchen

Copics N1, N3, N5, B000, RV000, RV10, RV13
Polychromos 
Signo marker white
Glossy Accents

An den folgenden Challenges möchte ich mit meiner Karte teilnehmen.
I would like to participate into the following challenges with my card.
Challenge #100 - Hurra!
As You like it
Fur or Feathers (and why)
I love pet rats, so I go for fur. One can cuddle a lot of fur animals, but hardly the ones with feathers. I like to cuddle :) 
Tuesday Throwdown
Challenge #404 - Anything goes