Mittwoch, 27. April 2022

Dachs segelt in der Box

 *** Dieser Post enthält Werbung. ***

*** This post contains advertisement. ***

Und noch einmal "Moin, Ihr Landratten!". Ich liebe diese maritimen Motive einfach. Und in diesem Fall sind es ja sogar meine geliebten Waldtiere, die hier im maritimen Look erscheinen. Es gibt nämlich nicht nur ein neues Stempelset "Ahoi, Freunde" bei Stamp Corner im neuen Release, es gibt auch noch das erste Set aus der Serie. Die Fische und der Anker sind ebenfalls darin enthalten.

And once again "Moin, you landlubbers!". I just love these maritime motifs. And in this case it is even my beloved forest animals, which appear here in a maritime look. There is not only a new stamp set "Ahoy, friends" in the new release of Stamp Corner, there is also the first set from the series in the store. The fish and the anchor are also included.
 
 
Dieses Mal habe ich eine Card in a box gestaltet. Hierfür gibt es auch mega praktische Stanzen, die habe ich hier verwendet. Den Dachs und die Fische habe ich mit Copics koloriert. Das Wort "Moin" habe ich mit einer Stanze ausgestanzt. Die Box selber habe ich mit Designpapier dekoriert.
 
This time I have designed a card in a box. For this there are also super handy dies, which I have used here. I have colored the badger and the fish with Copics. The word "Moin" (which means "hi") I die-cut. I have decorated the box itself with design paper.


Materialliste
Supplies
Stempel / stamps: Stamp Corner Ahoi Freunde SC-PS-0113
Stempelkissen / stamp pads: Ink on 3
Stanzen / dies: Stamp Corner SC-DIE-07 Moin, Studio Lights Essentials Die Exploding box SL-ES-CD116; Honey Bee Stamps HBDS-CDB Cloud Borders
Copics E31, E43, E44, E89, W0, W1, W3, W5, W7, W9, R20, R27, R29, R59, B000, B52, B97, B99
Sakura 0.8
Designpapier Stamp Corner SC-PP-002


An den folgenden Challenges möchte ich mit meiner Karte teilnehmen.
I would like to participate into the following challenges with my card.
Now you might think: But this is a card! A card in a box - it is not. I was so stupid to glue it together in a fancy way so that it is not foldable :) It is a decoration now .... not for sending in an envelope either, hehe
Blog Badge

I really really love to colour. So I mainly use outline stamps with cute images and love to colour them as the basis of my makes. 
Please grab our logo

Sonntag, 24. April 2022

Dachs im Rahmen

 *** Dieser Post enthält Werbung. ***

*** This post contains advertisement. ***

Oh, schon sehr bald gibt es ein wunderschönes neues Stempelset bei Stamp Corner. Es enthält drei mega knuffige Tiere aus dem Wald, aber in maritimer Stimmung. Ich liebe sie einfach. Heute habe ich diesen Knuffel für Euch. 

Oh, very soon there will be a beautiful new stamp set at Stamp Corner. It contains three mega cuddly animals from the forest, but in a maritime mood. I just love them. Today I have this cutie for you.
 

Ich mag es ja total, Dinge in Rahmen zu packen. Dieses Mal habe ich mir meinen Rahmen selber gebastelt. Er ist ein wenig erhaben, was Ihr im nächsten Bild gut erkennen könnt.

I really like to put things into frames. This time I have made my own frame. It is raised a little, which you can see well in the next picture.
 
 
Den süßen Dachs habe ich mit Ink on 3 gestempelt und mit Copics sowie Polychromos koloriert. Dann habe ich ihn von Hand ausgeschnitten. Die Ränder habe ich dann noch mit schwarzem Copic nachgezogen, damit kein weiß durchblitzt. 
 
I stamped the cute badger with Ink on 3 and colored it with Copics and Polychromos. Then I fuzzy-cut him. The edges I have then traced with black Copic, so that no white would shine through. 


Materialliste
Supplies
Stempel / stamps: Stamp Corner SC-PS-151 Matrosen Freunde 1; SC-PS-0147 Kleine Worte
Stempelkissen / stamp pads: Ink on 3
Stanzen / dies: Elizabeth Craft 779 Lucy Label Pop Up
Copics 100, 0, W0, W1, W3, W5, W7, R20, R27, R29, R59, B000, B52, B97, E0000, E30, E31, E43, E44, E93
Designpapier Stamp Corner
Polychromos 101, 132, 271, 274, 181, 175, 182, 197, 140
Sakura 0.8; 1.0


An den folgenden Challenges möchte ich mit meiner Karte teilnehmen.
I would like to participate into the following challenges with my card.
Blog Button
Grab our badge:
Ohhhh, that was such a hard decision this time. Floral or cute!!! I love my garden and nature so much and I also like to colour flowers, but funnily do bar far not do it as often as I colour cuties for my cards. They are just so fun and lovely. I love love love to make and send cute animal cards. I am being made fun of already. So definitely I need to admit I am the cutie party!
As You Like It Challenge

Mittwoch, 20. April 2022

Moin Moin - Neue Challenge bei Stamp Corner

 *** Dieser Post enthält Werbung. ***

*** This post contains advertisement. ***

Das Wetter ist derzeit so herrlich, da bin ich schon total in maritimer Stimmung. Irgendwie verbinde ich das nämlich maritim immer mit Urlaub. Wobei ich auch einen kuscheligen Platz am Kamin bei stürmischer See sehr mag. Dieses Jahr werde ich auch mal wieder Urlaub machen. Allerdings an einem kleinen See. Mal schauen, ob uns das Wetter hold ist, oder wir es uns drinnen in unserer Hütte kuschelig machen müssen.
 
The weather currently is so wonderful, I'm totally in a maritime mood. Somehow I always associate the maritime with vacation. I also do like a cozy place by the fireplace in stormy seas very much. This year I will be on vacation - has been a while. However, at a small lake. Let's see if the weather is kind to us, or if we have to make it cozy inside in our cabin.


Meine Karte von heute ist gar nicht gestempelt. Ich habe mit einer Schablone und Stanzen gearbeitet. Zunächst habe ich die Quadrate und die Wimpelform aus weißem Karton ausgestanzt und passende, etwas größere rote Elemente geschnitten. Die Stanzen sind aus einem Set, mit dem man eine Explosionsbox machen kann. Auf diese Elemente habe ich Distress Oxides durch die Schablone mit einem Pinsel aufgetragen. Die Elemente sind mit Abstandspads auf der Karte befestigt. Im Hintergrund habe ich maritimes Designpapier von Stamp Corner verwendet.  
Oben links in der Ecke habe ich noch eine Wimpelkette aufgeklebt, die ich ausgestanzt und mit Mustern bemalt habe. 

My card from today is not stamped at all. I worked with a stencil and dies. First, I die-cut the squares and pennant shape from white cardstock and cut matching, slightly larger red elements. The dies are from a set with which you can make an explosion box. I applied Distress Oxides to these elements through the stencil with a brush. The elements are attached to the card with spacer pads. In the background I used nautical design paper from Stamp Corner.  
In the upper left corner I added a pennant chain, which I die-cut and painted with patterns. 
 
 
Auf dem Stamp Corner Challenge Blog startet heute wieder eine neue Challenge für Euch. Einen Monat lang habt Ihr Zeit, mit Eurem Werk teil zu nehmen. Mit etwas Glück könnt Ihr auch etwas gewinnen. Zeigt uns dafür ein Werk, das ihr mit Stamp Corner Artikeln gestaltet habt und das auch zum Thema passen muss. Diesmal wollen wir von Euch Slimline-Karten sehen. HIER geht´s zur Challenge. 
 
On the Stamp Corner Challenge Blog starts today again a new challenge for you. For one month you have time to participate with your work. With a little luck you can also win something. Show us a work that you have designed with Stamp Corner items and that must also fit the theme. This time we want to see slimline cards from you. Click HERE to enter the challenge.
 

Materialliste
Supplies
Stempelkissen / stamp pads: Distress Oxides chipped sapphire, barn door
Stanzen / dies: Studio Lights Essentials Die Explosion Box
Schablonen / stencils: Stamp Corner 
Copic R46, B37


An den folgenden Challenges möchte ich mit meiner Karte teilnehmen.
I would like to participate into the following challenges with my card.


Montag, 18. April 2022

Grüße aus dem Zwergenwald

 *** Dieser Post enthält Werbung. ***

*** This post contains advertisement. ***

Ich bin so in Frühlingsstimmung. Auch wenn Pilze vielleicht eher in den Herbst sortiert werden, aber ich liebe Pilze so sehr, dass ich die Stanzen auf jeden Fall sofort ausprobieren wollte. Sie schaffen eine perfekte Atmosphäre für meine Gnomin. Sie begrüßt den Frühling in ihrem Zauberwald. 

I am so in the mood for spring. Even though mushrooms might be sorted more into fall, but I love mushrooms so much that I definitely wanted to try these dies right away. They create a perfect atmosphere for my female dwarf. She welcomes spring in her enchanted forest.
 

Die Zwergin habe ich mit Memento gestempelt und mit Polychromos koloriert. Sie und die Pilze habe ich in eine Frühlingswolke aus Acrylfarben gesetzt. Auf die Pilze habe ich noch Muster in weiß gemalt. 

I stamped the dwarf with Memento and colored her with Polychromos. She and the mushrooms I put in a spring cloud of acrylic paints. On the mushrooms I have painted patterns in white.


Materialliste
Supplies
Stempel / stamps: Stamp Corner SC-PS-0097 Gnome; SC-PS-0147 Kleine Worte 
Stempelkissen / stamp pads: Ink on 3
Stanzen / dies: Sizzix 665217 Funky Trees 
Polychromos 101, 103, 102, 106, 107, 111, 119, 135, 128, 123, 132, 189, 131, 193, 169, 180, 178
Sakura 1.0
Karin Brushmarker 226


An den folgenden Challenges möchte ich mit meiner Karte teilnehmen.
I would like to participate into the following challenges with my card.


Pop this on your blog to find us fast!

Freitag, 8. April 2022

Geburtstagstäschchen

 *** Dieser Post enthält Werbung. ***

*** This post contains advertisement. ***

Wo sind die Lila-Fans unter Euch? Ich muss ja zugeben, dass ich nicht so der mega Lila-Fan bin, ABER, diese Brombeer-Farbe hat mich schon in ihren Bann gezogen.
 
Where are the purple fans among you? I must admit that I am not the mega purple fan, BUT, this blackberry color faszinated me.
 

Für mein Täschchen habe ich aus Brombeer-farbenen Karton zweimal die Teile für das Täschchen ausgestanzt, gefalzt und zusammen geklebt. Für die Vorder- und Rückseite habe ich nochmal mit der Stanze aus weißem Karton die Teile gestanzt und die Ränder abgeschnitten. Dann  habe ich das Muster mit der Schablone und Distress Oxides aufgetragen und die Worte darauf gestempelt. An den Rändern habe ich das Papier etwas dunkel gefärbt. Auf die Vorderseite habe ich noch das Geschenkband und die Blume geklebt. An den Henkel ein Stück Schleifenband mit einem Stück Schnur gebunden. 
 
For my little bag I die-cut the parts for the little bag twice from blackberry-colored cardboard, folded them and glued them together. For the front and back, I again die-cut the parts from white cardstock  with the die and cut off the edges. Then I applied the pattern with the stencil and Distress Oxides and stamped the words onto them. I colored the edges of the paper with a darker tone. On the front I added the ribbon and the flower. On the handle I tied a piece of ribbon with a piece of string.
 

Materialliste
Supplies
Stempel / stamps: Stamp Corner SC-PS0147 Kleine Worte
Stempelkissen / stamp pads: Distress Oxides milled lavender, seedless preserves
Stanzen / dies: Stamp Corner SC-BXDIE-001 Tasche
Schablonen / stencils: Stamp Corner Stencil 20

An den folgenden Challenges möchte ich mit meiner Karte teilnehmen.
I would like to participate into the following challenges with my card.

Make My Monday Challenge Blog

Mittwoch, 30. März 2022

Lass Dich feiern, lieber Fauli!

 *** Dieser Post enthält Werbung. ***

*** This post contains advertisement. ***

In den kommenden Tagen ist es schon wieder so weit und weitere neue Stempelsets ziehen in den Shop von Stamp Corner ein. Unter anderem gibt es ein Set mit vielen Worten und Sprüchen zu fast allen Gelegenheiten. Und diesen mega tollen Hintergrundstempel, den Ihr auf meiner Karte sehen könnt. 

In the coming days it will happen again: more new stamp sets will move into the store of Stamp Corner. Among other things, there is a set with many words and sayings for almost all occasions. And this mega cool background stamp, which you can see on my card is amongst them as well. The text says: Let´s have a party for you!
 

Den süßen Fauli habe ich mit einem Grauton Memento gestempelt und mit Copics sowie Polychromos koloriert. Dann habe ich ihn von Hand ausgeschnitten und ihm noch glänzende Augen und eine glänzende Nase mit Glossy Accents gemacht. Den orange Farbenen Rahmen habe ich mit Distress Oxides eingefärbt. Dafür habe ich die gleiche Farbe wie für den Hintergrundstempel verwendet. Auf den Rahmen habe ich noch Wasser gespritzt, damit es etwas interessanter zu gestalten. Auf den grünen Rahmen habe ich Nuvo Drops aufgetragen und an einer Seite Bänder angeknüpft. 

I stamped the cute Fauli with a gray tone Memento and colored him with Copics and Polychromos. Then I fuzzy-cut him and gave him shiny eyes and a shiny nose with Glossy Accents. I colored the orange frame with Distress Oxides. I used the same color as for the background stamp. On the frame I also sprayed water to make it a little more interesting. On the green frame I applied Nuvo Drops and tied ribbons on one side.
 
 
Materialliste
Supplies
Stempel / stamps: Stamp Corner SC-PS-0112 Fauli
Stempelkissen / stamp pads: Memento grey flannel; Distress Oxides spiced marmelade
Stanzen / dies: Stamp Corner SC-A6DIE-001 Deckle Frames, SC-A6DIE-002 Lace Edge
Copics 0, E51, E55, E35, E33, E57, E27, E49, W1, W5, W6, YG21. YG25, YG17, YR14, YR04, R24, BG01, BG05, BG09
Polychromos 101, 107, 109, 121, 205, 166, 159, 270, 273, 175, 154, 153, 131
Nuvo Crystal Drops Gloss ripened pumpkin
Sakura 0.8


An den folgenden Challenges möchte ich mit meiner Karte teilnehmen.
I would like to participate into the following challenges with my card.
GRAB OUR BADGE
 

Donnerstag, 24. März 2022

Möhrchenhasen

 *** Dieser Post enthält Werbung. ***

*** This post contains advertisement. ***

Ach jeh, als ich diesen Schnuffelhasen gesehen habe, kam mir gleich der Gedanke, dass ich mehrere davon auf einer Karte versammeln wollte. Die Idee mit den Möhrenfarben kam mir dann aber erst etwas später. Aber sie sehen doch wirklich aus wie Möhrchen, oder? 

Oh well, when I saw this cute bunny I immediately thought that I wanted to gather several of them on a card. The idea with the carrot colors came to me only a little later. But they really look like carrots, don't they?
 
 
Und ich muss auch sagen, dass ich den Stencil, den ich für den Hintergrund verwendet habe, so passend fand, da es nicht nur der Rasen sein könnte, sondern diese Blätter mich so sehr an die Hasenohren erinnern - oder sollte ich sagen: an das Möhrchengrün? Hihi. Ich habe den oberen Teil abgeklebt, um den Horizont zu erzeugen und in Richtung der Kante eine dunklere Farbe verwendet. 
 
And I also have to say that I found the stencil I used for the background so fitting, because not only could it be the lawn, but those leaves remind me so much of the bunny ears - or should I say the carrot green? Hehe. I masked off the top part to create the horizon and used a darker color towards the edge.  


Der Spruch entstammt übrigens einem Set mit dem Nikolaus, aber er passt ja auch zu Ostern super. 

Meine Möhrchenhasen habe ich mit Copics und Polychromos koloriert, ausgeschnitten und mit Abstandspads auf der Karte angebracht. 

The saying, by the way, comes from a set with Santa Claus, but he fits also perfectly to Easter. It says: Somebody (could be somebunny) has to do the job. 

I have colored my carrot bunnies with Copics and Polychromos, fussy-cut them and attached with spacer pads on the card.


Materialliste
Supplies
Stempel / stamps: Create A Smile Aus meinem Garten, Keine Geschenke
Stempelkissen / stamp pads: Ink on 3; Distress Oxides bundled sage, rustic wilderness
Stanzen / dies: Create A Smile
Schablonen / stencils: Create A Smile
Copics 100, G0000, G21, G28, YR000, YR82, YR02, R05
Polychromos 101, 102, 108, 113, 131, 127, 263, 172, 278

An den folgenden Challenges möchte ich mit meiner Karte teilnehmen.
I would like to participate into the following challenges with my card.


Mittwoch, 23. März 2022

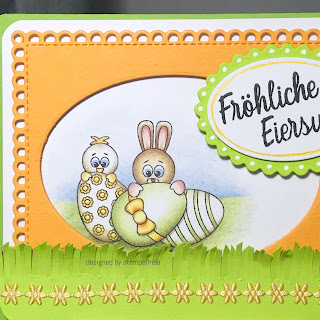
Fröhliche Eiersuche

 *** Dieser Post enthält Werbung. ***

*** This post contains advertisement. ***

In ein paar wenigen Wochen ist schon Ostern. Und da haben wir uns bei der Stamp Corner Challenge gedacht, dass wir doch einfach das Thema nehmen, mit dem Ihr Euch vermutlich eh grade beschäftigt. Wer ist denn dabei und zeigt uns seine/ihre Oster-Kreationen mit den Dingen aus dem Stamp Corner Shop? Zur Challenge geht es HIER. 

Only a few weeks to go and we will have Easter. And so we thought in the Stamp Corner Challenge team: Why not take a theme on which a lot of you work currently anyways? So who joins us at the challenge and shows us his/her creations with the Stamp Corner shop goodies? See all details about the challenge HERE.
 
 
Das süße Motiv habe ich mit Polychromos koloriert. Darüber habe ich das gestanzte Rechteck mit den niedlichen gewungenen Rahmen gelegt. Damit man das Motiv auch sehen kann, habe ich ein ovales Fenster in den orangefarbenen Karton gestanzt. Den Rasen habe ich mit einer Schere eingeschnitten und die einzelnen Rasenstränge noch ein bisschen uneben angeschnitten. Um das Oval mit dem Text ein bisschen dem orangefarbenen Rand anzupassen, habe ich in die geschwungenen Elemente weiße Punkte mit einem Acrylstift gemalt. Um den Text habe ich eine orangefarbene Linie gezogen.

I colored the cute motif with polychromos. Over it I put the die-cut rectangle with the cute curved frames. In order to be able to see the motif, I punched an oval window into the orange cardboard. I cut the lawn with scissors and cut the individual lawn strands a bit uneven. To make the oval with the text match the orange border a bit, I painted white dots in the curved elements with an acrylic pen. Around the text I drew an orange line.


Materialliste
Supplies
Stempel / stamps: Stamp Corner SC-PS-0139 Ostereier 
Stempelkissen / stamp pads: Ink on 3
Stanzen / dies: Stamp Corner SC-A6DIE-002 Lace Edge; MFT May Favourite Things Die-namics Blueprints 2; XCut XCU 503410 Nesting Dies Oval, XCU 503406 Nesting dies Scalloped Oval
Polychromos 101, 103, 105, 108, 113, 205, 170, 168, 167, 174, 173, 146, 120, 271, 273, 274, 132, 189, 131, 169, 283, 180, 280


An den folgenden Challenges möchte ich mit meiner Karte teilnehmen.
I would like to participate into the following challenges with my card.


Montag, 14. März 2022

Caramba

 *** Dieser Post enthält Werbung. ***

*** This post contains advertisement. ***

Ach, mir war nach frohen Farben. Dieser mexikanische Käfer macht jetzt erst einmal eine Pause und gönnt sich ein leckeres Getränk. Er entstammt dem Set "Caramba", welches es seit diesem Monat im Stamp Corner Shop gibt. Ich finde ihn so niedlich. Er macht eine herrliche Stimmung. 

Oh, I was in the mood for happy colors. This Mexican beetle is now taking a break and treats himself to a delicious drink. He comes from the set "Caramba", which is available in the Stamp Corner Shop since this month. I think he is so cute. He makes a wonderful mood.


Die leuchtenden Farben habe ich mit Copics und Polychromos realisiert. Den Hintergrund habe ich mit den passenden Farbtönen Distress Oxides gemacht, die ich mit Pinseln durch eine Schablone aufgetragen habe. 
Durch das Abrunden der gegenüberliegenden Ecken habe ich ein bisschen Schwung in die sonst einfach gehaltene Karte gebracht.
 
The bright colors I have realized with Copics and Polychromos. The background I made with the matching shades Distress Oxides, which I applied with brushes through a stencil.
By rounding the opposite corners, I brought a bit of a swing to the otherwise simple card.
 

Materialliste
Supplies
Stempel / stamps: Stamp Corner SC-PS-0144 Caramba
Stempelkissen / stamp pads: Ink on 3; Distress Oxides twisted citron, mermaid lagoon, spiced marmelade
Stanzen / dies: Stamp Corner SC-A6DIE-001 Deckle Frames
Schablonen / stencils: Stamp Corner SC-ST-21002 Stencil 3
Copics 0, W1, W3, YG00, YG01, YG25, YR21, YR04, YR18, BG11, BG11, BG49, RV42, E11, E13, E17, E29
Sakura 0.8
Polychromos 101, 132, 131, 169, 280, 106, 109, 115, 205, 166, 266, 156, 153


An den folgenden Challenges möchte ich mit meiner Karte teilnehmen.
I would like to participate into the following challenges with my card.

Banner zum mitnehmen

Montag, 7. März 2022

Ich war es nicht!

 *** Dieser Post enthält Werbung. ***

*** This post contains advertisement. ***

Na, wer kann denn diesem Dino böse sein, wenn er so charmant lächelt? Irgendwas hat er wohl angestellt, sonst würde er ja nicht sagen "Ich wars nicht!", aber na, Schwamm drüber, oder? Der herrliche Dino mit passendem Spruch entstammt dem neuen, von Oma Plott designten Stemmpelset "Wow" von Stamp Corner. 

Well, who can be angry with this dino when he smiles so charmingly? He must have done something wrong, otherwise he wouldn't say "I didn't do it", but well, let's forget it, right? The wonderful dino with matching saying comes from the new stamp set "Wow" from Stamp Corner, designed by Oma Plott.


Das Motiv habe ich mit Ink on 3 gestempelt und mit Copics koloriert. Die verwendeten Farben könnt Ihr unten aufgelistet finden. Meinen Hintergrund habe ich übrigens selber designed. Dazu habe ich frei Hand einige Streifen in unterschiedlichen Stärken mit den Copicfarben gezogen, die ich auch für das Motiv verwendet habe. Einen passenden Rahmen habe ich für das Motiv mit den Deckle Frames von Stamp Corner gestanzt.
 
I stamped the motif with Ink on 3 and colored it with Copics. You can find the colors used listed below. By the way, I designed my background myself. I drew some stripes in different thicknesses with the Copic colors, which I also used for the motif. I die-cut a matching frame for the motif with the Deckle Frames from Stamp Corner.
 

Den Dino habe ich dann mit Abstandspads auf dem Untergrund befestigt. Außerdem habe ich noch drei Sterne zum Motiv zugefügt. 

I adhered the dino with spacer pads on the background and also added three stars to my image.

 
Materialliste
Supplies
Stempel / stamps: Stamp Corner SC_PS-0143 Wow
Stempelkissen / stamp pads: Distress Oxides black soot; Ink on 3
Stanzen / dies: Stamp Corner SC-A6DIE-001 Deckle Frames
Copics YR01, E15, E81, W3, B0000, B00, B02, B05, B16, B39, Y00, Y02, Y08, Y19, G20, YG01, G14, G19
Polychromos 101, 189, 169, 283
Sakura 1.0


An den folgenden Challenges möchte ich mit meiner Karte teilnehmen.
I would like to participate into the following challenges with my card.
unser Banner zum Mitnehmen
Grab the Badge
You know what? I really really love interactive cards. BUT: I think it is so hard to capture the interaction in pictures or videos. Plus: If I invested so much effort into the interaction, I usually tend to not make the stuff around it so fancy. So I actually prefer to MAKE non-interactive cards and have the joy of colouring or designing. I do like to look at interactive cards from others a lot though!
 
As You Like It Challenge