Seiten

Dienstag, 29. September 2020

Alcohol Ink Pull Off for your background

 *** Dieser Post enthält Werbung. ***

*** This post contains advertisement. ***

Uiuiuiui, ein neuer Release geht am 01.10. bei Stamp Corner an den Start. Es wird mal wieder super niedlich. Heute habe ich Euch diesen Bären daraus mitgebracht. Für den Hintergrund habe ich die Alkohol Ink Pull Off Technik verwendet. 
 
Wohooo, a new release is there on the first at Stamp Corner! There are super cute designs again for you. Today I brought you this bear from it today. I used the alcohol ink pull off technique for my background.


Heute habe ich also nicht nur eine Koloration für Euch, sondern möchte Euch auch eine Technik vorstellen. Es sei gleich zu Anfang gesagt, dass die Idee für diese Technik nicht von mir ist. Eine Freundin hat mir von ihr erzählt. 
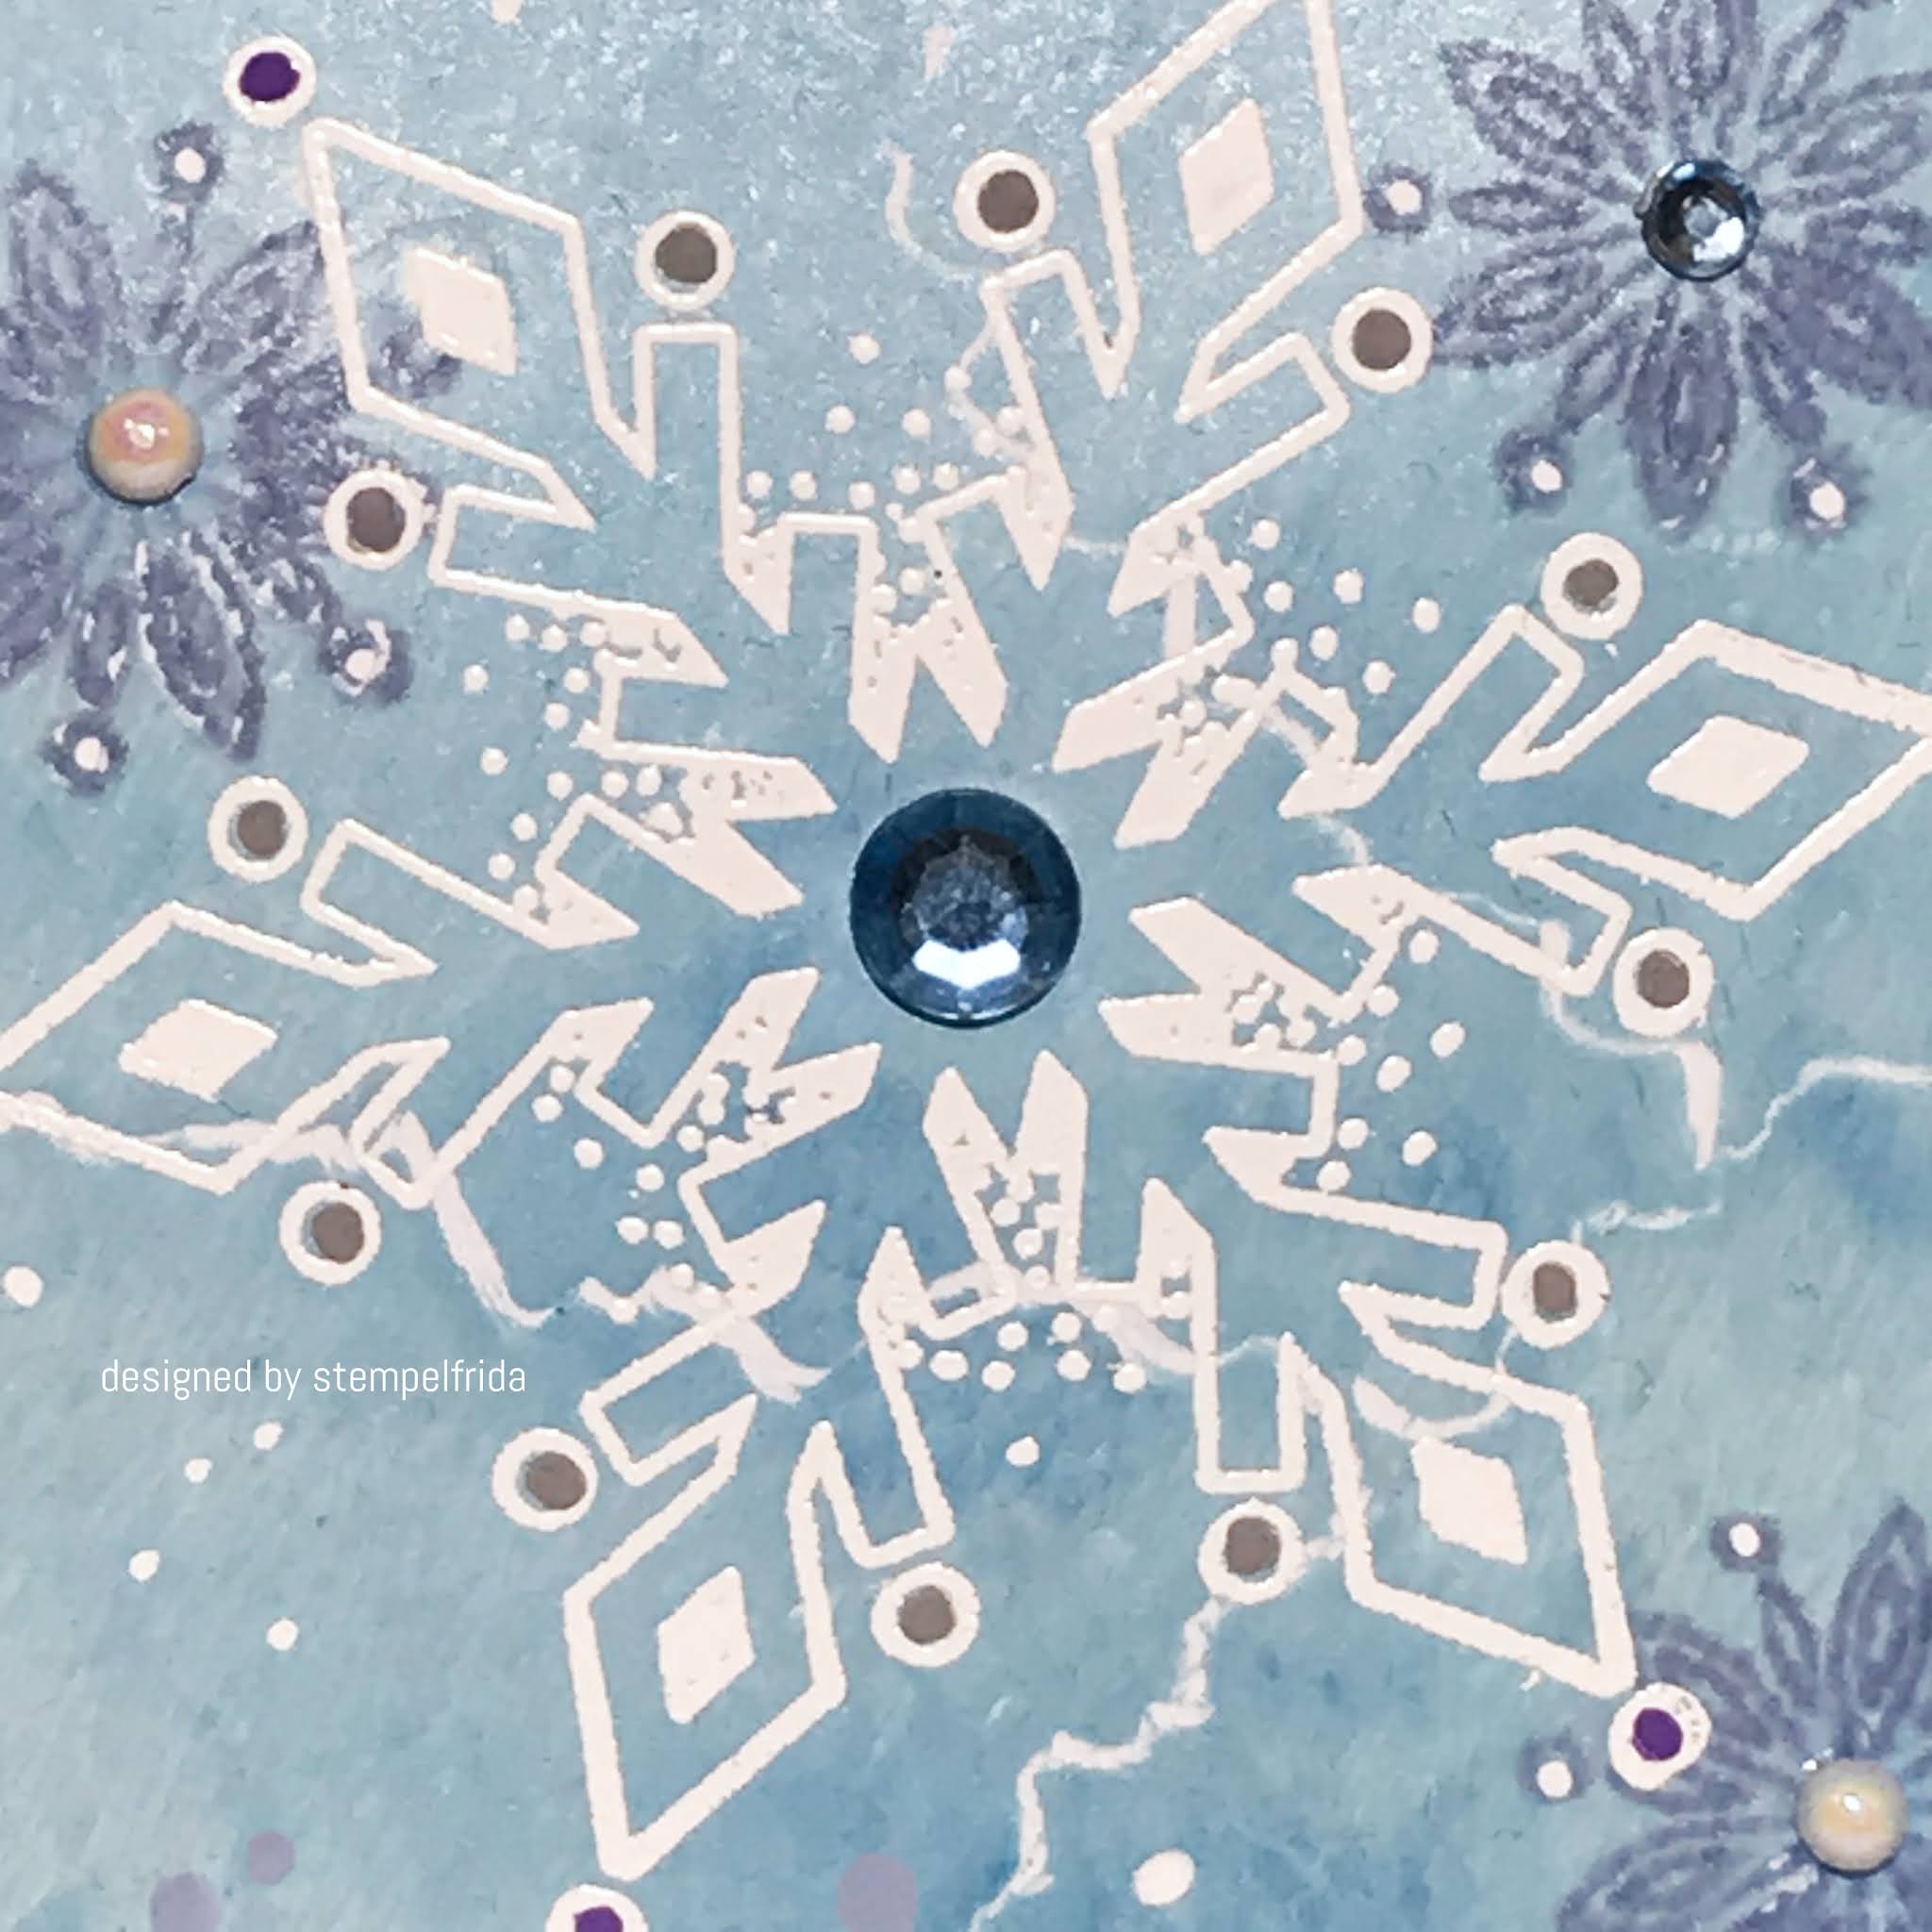
Wenn Ihr schon Hintergründe mit Alkohol Inks gemacht habt, dann wisst Ihr, dass das non plus Ultra Papier dafür Yupo Papier ist. Darauf verlaufen die Farben einfach am allerbesten. Die Nachteile dieses Papiers sind, dass es sich eigentlich nicht wirklich um ein Papier sondern eher um einen Kunststoff handelt. Dieser verträgt Hitze nicht so gut. Man kann also so gut wie gar nicht darauf embossen und stempeln auch nicht, denn die Oberfläche ist extrem rutschig (klar, darum verlaufen ja die Farben so gut!). Aber es ist nicht nur, dass die Stempeln stark rutschen und schmieren, es gibt auch nur wenige Stempelpads, die man verwenden kann, die dann auch permanent sind. Einige davon brauchen ewig, um zu trocknen. Oft hat man auch leicht feuchte Bereiche von den Alkohol Inks auf der Oberfläche. Desweiteren ist Yupo Papier sehr teuer. 

Heute habe ich Euch eine Lösung mitgebracht. Ihr macht erst einmal Euren tollen Hintergrund auf dem besagten Yupo Papier (weil es ja einfach unschlagbare Fließeigenschaften hat) und lasst es trocknen. Dann tragt Ihr auf den Hintergrund ein bisschen Alkohol Lift Ink Reinker mit einem Brayer auf. Legt dann ein einfaches Papier darauf und streicht es ab. So transferiert Ihr Euren Hintergrund auf das einfache Papier und Ihr könnt darauf super stempeln und embossen. Toll, nicht? Und Ihr könnt sogar Euer Yupo Papier wieder verwenden, denn Ihr könnt restliche Farbe mit Alkohol abwischen. Bei dieser Karte habe ich diese Technik das erste mal angewendet. 

So today I not only have a coloration for you, but I would like to introduce a technique. It should be said right at the beginning that the idea for this technique is not mine. A friend told me about it.
If you have already made backgrounds with alcohol inks, you know that the non plus ultra paper for this is yupo paper. On this paper the colors run best. The disadvantages of this paper are that it is not really a paper but a plastic. It does not stand heat very well. So you can hardly emboss or stamp on it, because the surface is extremely slippery (of course, that's why the colors run so well!). But it's not only that the stamps slip and smear a lot, there are only a few stamp pads you can use, which are permanent. Some of them take forever to dry. Often you have slightly moist areas of the alcohol inks on the surface. Furthermore Yupo paper is very expensive.

Today I brought you a solution. First you make your great background on the Yupo paper (because it has unbeatable flow properties) and let it dry. Then you apply a little bit of alcohol Lift Ink Reinker on the background with a brayer. Then put a simple paper on top of it and rub it off. This way you transfer your background onto the simple paper and you can stamp and emboss on it. Great, isn't it? Plus: You can reuse the Yupo paper, because you can clean the rest of your colors off with alcohol. This is the first time I used this technique on this card.


Materialliste
Supplies
Stempel / stamps: Stamp Corner SC-PS-0080, SC-PS-0054; Lawn Fawn LF2419 Over the mountain Borders 
Stempelkissen / stamp pads: Ink on 3
Copics C0, C1, C4, Y11, Y18, RV91, RV34, BV31, BV34, BV29
Sakura 0.8
Polychromos 101, 102, 107, 109, 125, 160, 235
Alcohol Ink Ranger Indigo, pink sherbet, wild plum, sunshine yellow
Alcohol Lift Ink Refill
 
 
An den folgenden Challenges möchte ich mit meiner Karte teilnehmen.
I would like to participate into the following challenges with my card.

Freitag, 25. September 2020

Snowflakes on an icy background

*** Dieser Post enthält Werbung. ***
*** This post contains advertisement. ***

Bei diesem schönen Herbstwetter denkt man vielleicht noch nicht an Schnee, aber dieses tolle Schneeflockenset aus dem neuen Release von Visible Image lockt einfach, sich in glitzernde Schneelandschaften zu begeben. 
 
One might not think of snow with this beautiful autumn weather, but this wonderful set of snowflakes from the new release of Visible Image tempted me so much to dive into a glittery snowy landscape. 


Den Hintergrund mit den kleineren Schneeflocken auf einer Gelli Plate gemacht. Zunächst einmal hieß es dafür: Farbe auftragen. Ich habe blau, weiß und silber gemischt und mit einem Brayer verstrichen. In die feuchte Farbe habe ich den mit Distress Oxides angefärbten Schneeflocken-Stempel gedrückt. Restfarbe habe ich auf ein weißes Blatt abgestempelt (das wird dann auch zu einer Karte verarbeitet). Ihr könnt diese in meiner Kollage oben rechts erkennen. 
 
Weiter geht es dann im dritten Bild. Dort habe ich den eisigen Effekt gemacht indem ich mit einem Holzstab krackelige Linien gezogen habe. Im letzten Bild ist der Gelli Plate Abzug zu sehen. 
 
 
The background of my card is made with the little snowflake stamp on a gelli plate. Fist to go was to apply paint on the gelli plate. I mixed blue, white and silver for it and distributed it on the plate with a brayer. I applied Distress Oxides on the snowflake stamp and pressed it randomly on the gelli plate. After each print I stamped the rest of the paint off on a separate paper (which will be used for another card sometimes). You can see it on the upper right in the little collage.

We continue on the bottom left of the collage: I created an icy effect with a wooden stick and drew shaking lines. You can see the final print on the bottom right.  
 

Auf den gut getrockenten Hintergrund habe ich dann die bezaubernde große Schneeflocke mit Versamark gestempelt und in weiß embosst. Den Schriftzug habe ich in blau embosst. Auf der Karte verteilt habe ich dann Halbperlen und Glitzersteine geklebt. 

Außerdem habe ich verschiedene Punkte und Flecken mit Acrylmarkern gezeichnet. 

 
I stamped the magical big snowflake with Versamark and embossed it in white on the well dried background. The sentiment is embossed in blue. I glued half pearls and glitter stones on the card.
 
I added accents of acrylic paint all over the card with acrylic marker.  


Materialliste
Supplies
 
 
Stempel / stamps: Visible Image Classic Christmas, Simply Snowflakes 
 

Stempelkissen / stamp pads: Versamark; Distress Oxides faded jeans
Embossingpulver / embossing powder: Stampendous! detail white; blue: unknown   
Posca lilac, white, grey
Paint Marker blue bell
Gelli Plate
Acrylic Paint 
 
An den folgenden Challenges möchte ich mit meiner Karte teilnehmen.
I would like to participate into the following challenges with my card.

Dienstag, 22. September 2020

Älter ist wie jung - nur besser

 *** Dieser Post enthält Werbung. *** 

*** This post contains advertisement. ***

Ganz oft liest man ja, dass Ihr Euch mit Männerkarten schwer tut. ... Vielleicht liegt das an den Motiven, die wir so gerne verwenden und dass wir diese für Männer nicht so passend finden, aber wenn man es eher abstrakt hält, dann passt das eigentlich mit den Karten, oder? Und für eine Frau kann man sie dann auch verwenden. So wie bei dieser Karte hier. 
 
Very often you read that you have difficulties with men's cards. ... Maybe it's because of the motifs we like to use and that we don't find them so suitable for men, but if you keep it rather abstract, then it actually fits with the cards, doesn't it? And you can use them for a woman as well. Just like this card here. The texts says: "Older is as being jung - just better." And  in the background it reads: "Party on!"


Den Spruch auf dem Tag (das ist übrigens eine Stanze aus einem Set, welches ich mir grade erst gegönnt habe, hihihi) habe ich mit Distress Oxides gestempelt, an den Rändern Schatten mit Polychromos und Highlights mit Sakura in weiß gesetzt. Den weißen Marker habe ich auch noch für viele vereinzelte Akzente und Gekritzel auf der ganzen Karte verwendet. 
 
 
Mein Hintergrund bildet ein Gelli Plate Print mit Acrylfarben. Diesen habe ich an einer Kante abgerissen und mit weiß gemattet. Außerdem habe ich noch ein bisschen hier und da mit Posca-Markern drauf gemalt. Die Pfeile sind auch gestanzt, wie auch das Spinnennetz. Auf dem Netz sind Nuvo Drops. Den Spruch auf dem Hintergrund habe ich mit Archival gestempelt und im mittleren Bereich der Buchstaben noch weiß aufgetragen. 


The saying on the tag (this is a die from a set I just bought, hihihi) I stamped with Distress Oxides, set shadows with polychromos and highlights with Sakura in white. I also used the white marker for many single accents and doodles on the whole card. 
 
My background is a Gelli Plate Print with acrylic colours. I tore off one edge and matted it with white. I also painted a bit here and there with Posca markers on it. The arrows are also die cuts, as well as the spider's web. I added Nuvo Drops to the net. I stamped the saying on the background with Archival and applied white paint in the middle of the letters.


Materialliste
Supplies
Stempel / stamps: Stamp Corner SC-PS-0015, SC-PS-0049
Stempelkissen / stamp pads: Distress Oxides Peacock feathers; Archival faded jeans
Stanzen / dies: Sizzix Frightful Things 664205; Stampers Anonymous 658784 Tag Collection; 15 331 15Studio Light Industrial 2.0
POSCA blue, light blue, grey, emerald green
Sakura 0.5, 0.8 
Polychromos 149
Stampin Up marker midnight muse
Nuvo Crystal Drops Gloss caribbean dream

 
An den folgenden Challenges möchte ich mit meiner Karte teilnehmen.
I would like to participate into the following challenges with my card.

Freitag, 18. September 2020

Cuddly friends

*** Dieser Post enthält Werbung. ***
*** This post contains advertisement. ***

Ihr habt sicherlich schon das ein oder andere Set mit diesen zwei süßen Freunden bei Stamp Corner gesehen. Das neuste Set hier zeigt die beiden in Weihnachtsstimmung. Sind sie nicht mega toll, die beiden? 
 
 You might have seen one or the other set with those two cude friends here at Stamp Corner. The newest one shows them in Christmas mood. Aren´t they super cuddly, those two? The sentiment says:"There are many presents under the Christmas tree but the best one is you!".


Erst einmal habe ich mir die Schneekugel gestanzt und dann die beiden kuscheligen Freunde mit Memento hinein gestempelt. Alles habe ich mit Copics koloriert: auch die ausgestanzten Zweige und Beeren. Hier und da habe ich Akzente mit Sakura in weiß gesetzt. Die unteren Ränder meiner Karte habe ich abgerundet. An den Rändern habe ich ein bisschen Schatten und Nähte gezeichnet. Das Schild ist ebenfalls mit Copics koloriert und der Text mit Distress Oxides gestempelt.  

First I die-cut the snow globe and then stamped the two cuddly friends with memento onto it. I coloured everything with Copics: even the punched out branches and berries. Here and there I set accents with Sakura in white. I rounded the lower corners of my card. At the edges I drew some shadows and stitches. The sign is also coloured with Copics and the text is stamped with Distress Oxides. 


Materialliste
Supplies
Stempel / stamps: Stamp Corner SC-PS-0077
Stempelkissen / stamp pads: Memento espresso truffle; Distress Oxides ground espresso
Stanzen / dies: Sizzix Hidden Flowers 664581; 128016 BXAT-AA-XC
Stampin Up Marker chocolate chip
Sakura 1.0
Copics 0, B0000, B00, B01, BG45, G19, R20, R22, R24, R29, E40, E42, E81, E84, E87, E89
 
 
An den folgenden Challenges möchte ich mit meiner Karte teilnehmen.
I would like to participate into the following challenges with my card.
My "A" is a big "AAAWWWWHHHH!!!!" - though I came up with several A´s like alcohol marker, animals
 

Dienstag, 15. September 2020

Herbstlich wird es bei bastel-traum

*** Dieser Post enthält Werbung. ***
*** This post contains advertisement. ***

Ach, ich liebe ja die wunderschönen Farben im Herbst. Und daher habe ich mich über die neue Challenge bei bastel-traum mit dem Thema Herbst sehr gefreut. Da konnte ich auch endlich mal diese wunderschöne Herbstset von Gerda Steiner Designs verwenden, dass ich schon so lange habe, aber noch nicht benutzt hatte. 

Oh yes, I love the wonderful colours of autumn so much. And therefore I was so happy about the new challenge at bastel-traum with the autumn theme. So I could use this cute autumn set from Gerda Steiner Designs, which I own for so long already, but did not use until now.


Zunächst einmal habe ich die Motive mit Memento gestempelt. Ich mag den Farbton espresso truffle sehr gern, denn er ist nicht ganz so hart wie schwarz. Es passte besser zu meinen herbstlichen Farben, die ich mit Copics und Polychromos auf die Motive aufgetragen habe. Die Motive habe ich dann von Hand ausgeschnitten. 

Den Hintergrund bildet ein altes Stück Karton, das ich vor vielen Monaten mit weißem Gesso bestrichen hatte. Darauf habe ich mit Poscastiften Kleckse gemalt und einen passenden Kreis ausgestanzt. Auf die Basiskarte habe ich an der richtigen Stelle den Text gestempelt und am Rand den schwarzen Rahmen von Hand gezogen. 

An der linken Seite meiner Karte habe ich kleine Löcher in den Hintergrund gestanzt und darin verschiedene Bänder gezogen und verknotet. 


First of all I stamped the motifs with Memento. I like the colour espresso truffle very much, because it is not quite as hard as black. It matched my autumn colours better, which I applied to the motifs with copics and polychromos. I then fuzzy-cut the motifs.

The background is an old piece of cardboard that I had painted with white gesso many months ago. On it I drew blotches with posca pencils and punched out a matching circle with a die. On the base card I stamped the text in the right place and drew the black frame on the edges by hand.

On the left side of my card I punched small holes into the background and knotted different ribbons in it.


Nochmal zur Erinnerung: Auf dem Bastel-Traum Blog startet heute eine neue Challenge für Euch mit dem Thema Herbst. Spielt Ihr wieder mit?

And to remind you again: Today starts a new challenge for you on the bastel-traum blog with the theme autumn. Are you in?


Materialliste
Supplies
Stempel / stamps: Gerda Steiner GSD644 Foxes
Stempelkissen / stamp pads: Memento espresso truffle
Stanzen / dies: MFT-347 My Favorite Things Pierced Circle STAX
Copics 0, E41, E53, E19, E97, E99, E59, YR23, YR18, Y18, YG25
Copic Multiliner 0.1, 0.5
Sakura 0.5, 1.0
Polychromos 111, 187, 188, 180, 280, 217, 167
Posca yellow, brown, bright yellow

An den folgenden Challenges möchte ich mit meiner Karte teilnehmen.
I would like to participate into the following challenges with my card.

Samstag, 12. September 2020

Mein Stern - my star

*** Dieser Post enthält Werbung. ***
*** This post contains advertisement. ***

Den Stempel aus dem neuen Weihnachts-Release von Visible Image, den ich heute verwendet habe, kann man wundervoll auch für nicht weihnachtliche Karten verwenden. Und der Stempel ist sooo wunderschön, der braucht eigentlich gar keine weiteren an seiner Seite. 
Wer ist Euer Stern am Himmel?
  The stamp I used today is part of the new Christmas release from Visible Image, but it could also be used for a non-Christmas card. And this one stamp is soooo beautiful that it does not need any other stamp to go along. 
Who is your star in the sky?


Nachdem ich den Sternenstempel mit Versamark auf Aquarellpapier gestempelt hatte, habe ich ihn mit farblosem Embossingpulver embosst. Darüber habe ich Aquarellfarbe aufgetragen. 

Den Stern habe ich dann nochmals gestempelt und embosst, ausgeschnitten und in der Mitte mit Aquarellfarbe koloriert. Den Stern habe ich dann komplett mit farblosem Embossingpulver überzogen und anschließend noch silbernes und türkises Pulver in die heiße Masse gestreut und abermals erhitzt. Die drei Glitzersteinchen habe ich aufgeklebt. 

Auf den Hintergrund habe ich flüssige Halbperlen gesetzt und Sprenkel mit Aquarellfarbe gemacht. Den Stern habe ich versetzt auf den Hintergrund mit Abstandspads geklebt. 


After stamping the star stamp with Versamark on watercolor paper, I embossed it with colorless embossing powder. Over this I applied watercolor paint.

I then stamped and embossed the star again, cut it out and colored it in the middle with watercolor paint. The star was then completely covered with colorless embossing powder and afterwards I sprinkled silver and turquoise powder into the hot mass and heated it again. The three glitter stones I glued on.

On the background I put liquid half pearls and made speckles with watercolor. I glued the star on the background with spacer pads.


Hier ist nochmal eine Nahaufnahme des fertigen Sterns und des Hintergrunds. 
 Here is another zoom of the star and the background ready to be attached.


Den neuen Weihnachtsrelease könnt Ihr bereit vorbestellen. Er wird am 18.09. ausgeliefert. 
 You can already pre-order the new Christmas release and it will be released on September 18.

SHOP


Materialliste
Supplies


Stempel / stamps: Visible Image Scribbled star 


Stempelkissen / stamp pads: Versamark
Embossingpulver / embossing powder: Kartenkunst flüssiges silber; Rayher transparent; Ranger Distress embossing glaze broken china
Nuvo Crystal Drops Gloss caribbean ocean
Posca emerald green 
Schmincke HORADAM Aquarellfarbe / water colour

An den folgenden Challenges möchte ich mit meiner Karte teilnehmen.
I would like to participate into the following challenges with my card.