Seiten

Samstag, 31. August 2019

Is there anything else you want to say?

 *** Dieser Post enthält Werbung. ***
*** This post contains advertisement. ***

Na, was will man der kleinen süßen Fledermaus noch sagen? .... DU BIST SOOOOO SÜÜÜÜÜßßßßß! ...oder? Diese Süße hier ist in einem der neuen Sets, die es im September-Release von Scrapbook Forever geben wird. Waaaahhhhh!!!
The sentiment on the card says:"Is there anything else you want to say?" ... so what do you want to say? ..... YOU ARE DAMN CUTE!!!!!!!!!! ....Isn´t she? This cutie here is one of the ones in a set of bats, which will be available from September on in the new release of Scrapbook Forever.

Die Fledermaus ist mit Memento gestempelt und mit Copics und Polychromos koloriert. Akzente habe ich mit einem Signomarker gemacht.

Für den Hintergrund meiner Karte habe ich zunächst die Herzen mit einer Schablone und Strukturpaste aufgetragen. Als sie gut getrocknet waren habe ich dann die pinke Farbe mit Aquarellfarbe aufgetragen, ein paar Sprenkel damit gemacht und die bräunlichen dunklen kleinen Kleckse mit Copics gemalt.  Ein paar der getrockneten Herzen habe ich  mit Posca in weiß eingefärbt.

Der Text ist mit Versamark auf einem Stück Papier gestempelt, welches ich vorher mit dem passenden Farbton eines Copicmarkers eingefärbt hatte. Dann habe ich den text in weiß embosst. 

The bat is stamped with Memento and coloured with Copics and Polychromos. I made accents with a Signo marker. 
For the background of my card I first applied the hearts with a stencil and structure paste. When they were well dried I then applied the pink paint with watercolour, made a few speckles with it and painted the brownish dark little spots with Copics.  I dyed some of the dried hearts with Posca in white.
The text is stamped with Versamark on a piece of paper, which I had dyed before with the matching colour tone of a Copic marker. Then I embossed the text in white.

Materialliste
Supplies
Stempel / stamps: Scrapbook Forever Fledermäuse, Rentnerpaar
Stempelkissen / stamp pads: Memento tuxedo black, Versamark
Embossingpulver / embossing powder: Stampendous! detail white

Schablonen / stencils: Scrapbook Forever Herzen
Copics 0, Ohren: RV10, R85, RV19, RV69, Gesicht, Brust, Füße RV000, E04, E18, Flügel RV91, E71, E74, E77, E79, Kopf, Leib zusätzlich R81, RV99
Signomarker
Posca PC-3M white
Polychromos 101, 131, 125, 133, 146, 280
Strukturpaste / structure paste


An den folgenden Challenges möchte ich mit meiner Karte teilnehmen.
I would like to participate into the following challenges with my card.
As You like it 
Favourite way to add text 
The card is a typical example of how I love to add text: On a separate piece of paper and embossed. Somehow the text on a lot of my cards end up like this :)
I think that it pops up more, so the text does not get lost, but also, the image is not touched so much by it, when it is seperate.
Moving along with the Times
Challenge #105 - Things with wings
Crafty Creations
Challenge #397 - Anything goes

Donnerstag, 29. August 2019

Menschen wie Du

Leider habe ich in meinem Garten oder im Wald dieses Jahr noch keinen Fliegenpilz gesehen, dabei mag ich sie ja so gerne. Na, dann habe ich mir eben einen selber gezaubert, hihi.
Unfortunately I haven't seen a fly agaric in my garden or forest yet this year, but I like them so much. Well, then I just made one for myself, hihi. The sentiment on the card says:" People like you make the world a bit better."

Den Hintergrund habe ich mit Alkoholinks gestaltet. Es tut mir wirklich leid, ich schreibe mir die Farben ja sonst IMMER auf, damit ich sie Euch nennen kann, aber in diesem Fall ist es mir druchgegangen. Den Pilz habe ich mit Memento gestempelt und mit Copics koloriert. Die habe ich Euch aber alle unten aufgeführt! 
I designed the background with alcohol links. I'm really sorry, I ALWAYS write down the colours so that I can tell you about them, but in this case I forgot. I stamped the mushroom with Memento and coloured it with Copics. But those I have listed all below! 

Materialliste
Supplies
Stempel / stamps: Stamp Corner Pilz, Menschen wie Du
Stempelkissen / stamp pads: Memento tuxedo black
Copics 0, E81, E84, E87, YG03, YG17, E13, R12, R14, R17, R29, R59
Polychromos 180


An den folgenden Challenges möchte ich mit meiner Karte teilnehmen.
I would like to participate into the following challenges with my card.

Montag, 26. August 2019

Mein Monat 2019-07

Wenn ich mir meine Kollage des Monats Juli so anschaue, dann habe ich verdammt viel mit blau gearbeitet! Mensch, bis auf den Rasenmäher da in der Mitte meiner Kollage gibt es nicht viel mit orange zum Beispiel. Vielleicht sollte ich mir das mal für meine nächsten Karten vornehmen: gelb und orange mit einbauen. Da wäre ja jetzt mit beginnendem Herbst die passende Zeit für!

When I look at my collage of the month July, then I have worked damn much with blue! Oh, except for the lawnmower in the middle of my collage there is not much in orange for example. Maybe I should have that in mind for my next cards: yellow and orange tones. Now with the beginning of autumn would be the right time for that, right?


Es gibt ja im Moment eine Aktion im Netz, die auf die Nutzung von Stempeln und Stanzen der Originalhersteller aufmerksam macht. Ich möchte mich auch ausdrücklich dazu erklären: Bitte achtet beim Kauf darauf, dass Ihr keine geklauten Designs kauft, sondern die Produkte der Originalfirmen, die sie mit Liebe kreiert haben. Leider werden viel zu viele Ideen gestohlen. Außerdem möchte ich Euch auch ermuntern: Wenn Euch etwas inspiriert, dann gebt doch Eure Quelle der Inspiration an. Die anderen Künstler werden sich sehr darüber freuen. Und die Quelle mit "gefunden bei Instagram" ist als würde man sagen: Der Song ist aus dem Radio!
At the moment there is an action on the internet, which draws attention to the use of stamps and dies of the original manufacturers. I would also like to make an explicit statement here: When buying goodies, please make sure that you don't buy stolen designs, but the products of the original companies who created them with love. Unfortunately, far too many ideas are stolen. I would also like to encourage you: If something inspires you, then name your source of inspiration. The other artists will appreciate it so much. And naming the source as "found on Instagram" is like saying "The song is from the radio".
 
#WELOVEYOURDESIGNS


Ich möchte meine Kollage wie immer bei Anna´s Art von Ingrid verlinken.
As always I would like to link my collage at Anna´s Art from Ingrid.


Herzlich Eure / Kind regards from

stempelfrida

Samstag, 24. August 2019

Hauptsache, es geht Dir gut!

Na, wer hat diesen Spruch noch nie gehört: "Du hast Dich ja überhaupt nicht verändert!" Manchmal stimmt er annähernd und manchmal ist er vollkommen gelogen. Aber wen interessiert schon, ob man noch so ist wie "damals"? Hauptsache, Ihr fühlt Euch JETZT wohl! :)
Well, who has never heard that saying: "You haven't changed at all!" Sometimes it's almost true and sometimes it's just a big lie. But who cares if you are still like "back then"? The main thing is that you feel great NOW! :)
The text on the card says:"back then" and "today" on the top and then at the bottom:" You did not change at all - Happy Birthday"


Die beiden Fotos habe ich mit Memento gestempelt und mit Copics koloriert. Akzente habe ich mit einem Signomarker gesetzt. Die Fotorahmen habe ich mit Distress Oxides gestempelt und ausgeschnitten. Die Damen habe ich möglichst genau auch ausgeschnitten und dann in die Rahmen geklebt. Die Rahmen selber sind mit Abstandspads höher auf die Karte gesetzt. Die schwarzen Texte sind gestempelt, den roten habe ich selber mit einem Tombow geschrieben. Die Sterne sind ausgestanzt und aufgeklebt. Die Ecken der Karte habe ich unten abgerundet. 

I stamped the two photos with Memento and coloured them with Copics. I have set accents with a Signo marker. I stamped the photo frames with Distress Oxides and cut them out. I also cut out the ladies as exactly as possible and glued them into the frames. The frames themselves are placed higher on the card with spacer pads. The black texts are stamped, the red one I wrote myself with a tombow marker. The stars are punched out and glued on the card. The corners of the card are rounded.   

Materialliste
Supplies
Stempel / stamps: Scrapbook Forever Rentnerpaar, Gute Zeiten; Happy Little Stampers Fun Birtday Sentiments
Stempelkissen / stamp pads: Memento tuxedo black; Distress Oxides black soot

Stanzen / dies: Sizzix 663095 Swirling Stars
Copics B000, B91, G00, BG13, BG49, Y19, YR31, YR23, YR24Haut: E00, E11, E13, R43, RV11; Haare R02, R27, R89, RV99
Signomarker weiß 
Tombow 847
Polychromos 169

An den folgenden Challenges möchte ich mit meiner Karte teilnehmen.
I would like to participate into the following challenges with my card.

Mittwoch, 21. August 2019

Hearty bear and welcome Sally

Manchmal kann man Details aus einem Stempelmmotiv zusätzlich zum eigentlichen Motiv verwenden. So habe ich es hier zum Beispiel mit dem niedlichen Bären und dem darin enthaltenen Herzen gemacht. 
Sometimes you can use details from a stamp motif in addition to the actual motif. I have done it here for example with the bear and the heart contained in it. The sentiment reads:"You are my hero".


Den Bären habe ich mit Memento in rich cocoa gestempelt. Dann wirkt der Rand nicht so hart als wenn man das sonst so häufig verwendete schwarz benutzt. Koloriert habe ich ihn mit Copics, Polychromos und einem weißen Signomarker. Danach habe ich ihn mit der Schere ausgeschnitten. Den Bären - oder besser gesagt das Herzstück - habe ich dann noch ein paar weitere Male abgestempelt und auch diese Herzen so koloriert und ausgeschnitten. Der Spruch ist aus dem Superhero Set. Für die Kollage habe ich einige Papiere mit verschiedenen Stanzen ausgestanzt und übereinander angeordnet. Akzente habe ich mit verschiedenen Markern gesetzt. So zum Beispiel habe ich die dicken blauen Punkte im Hintergrund mit einem POSCA Marker gemacht. Das Loch am Tag habe ich mit einer Öse versetzt unter die ich einen Kreis gelegt habe. 

I stamped the bear with Memento in rich cocoa. The edge doesn't look as hard as if you used the black one, which is used so often. I coloured it with Copics, Polychromos and a white Signomarker. Then I cut it out with scissors. I stamped the bear - or better said the heart piece - a few times and also coloured and fussy cut these hearts. The saying is from the Superhero set. For the collage I punched out some papers with different dies and arranged them on top of each other. I have set accents with various markers. For example, I made the thick blue dots in the background with a POSCA marker. I put an eyelet into the hole in the tag under which I put a circle. 

Ich habe eine neue Followerin auf meinem Blog entdeckt. Daher möchte ich Sally heute ganz herzlich willkommen heißen. Wie schön, dass Du meinen Blog aboniert hast! Ich hoffe, Du findest Gefallen an meinen Beiträgen.
I discovered there is a new follower on my blog. So I am very happy to warmly welcome Sally on my blog today. It is so nice of you that you are following the stempelfrida blog and I hope you will enjoy.


Materialliste
Supplies
Stempel / stamps: Stamp Corner Bär, Super Hero SC-PS-0027
Stempelkissen / stamp pads: Memento rich cocoa; Distress Oxides stormy sky
Stanzen / dies: MFT Blueprints 2, MFT-606 In and Out diagonal Stchd Rec ST, MFT-375 PCD TRAD Tags STAX
Copics W1, W4, W6, B21, B34, B37, RV11, E41, E53, E55, E13, E21, E33, E35, E37, E59
Copic Multiliner sepia, cool grey
Signo Marker weiß
Polychromos 101, 102, 120, 157, 146, 271, 274, 235, 189, 131, 169, 187, 180, 280, 177
POSCA slate grey

An den folgenden Challenges möchte ich mit meiner Karte teilnehmen.
I would like to participate into the following challenges with my card.
Pearly Sparkles 
Challenge #43 - Something beginning with "B"
My "B" is for bear and it even works in German AND English :)
Simon Says Stamp Wednesday Challenge
Simon Says: Midsummer Blues
Through the Craftroom Door
Challenge August 20 - Anything goes

*** Dieser Post enthält Werbung. ***
*** This post contains advertisement. ***

Sonntag, 18. August 2019

Verschnürt und ausgeflippt!

Diesen Monat hat es nochmal ein paar zusätzliche witzige Stempelsets von Scrapbook Forever gegeben. In einem von diesen ist dieser verschnürte Mann enthalten. Ich habe ihn mit einem Text aus einem früheren Set kombiniert. Na, was meint Ihr, werdet Ihr ausflippen? hihihi....
This month there have been some additional funny stamp sets from Scrapbook Forever. One of them contains this tied up man. I combined it with a text from a previous set. The sentiment says: Unpack, look, freak out. Well, what do you think, are you going to freak out? hihihi....
 

Den verschnürten Mann habe ich  mit Memento gestempelt und mit Copics und Polychromos koloriert. Den Text habe ich mit Versamark gestempelt und mit weißem Embossingpulver embosst. Die Schrrauben an dem Spruchfähnchen sind Brads.

Im Hintergrund habe ich die Sterne mit Brillance Stempelpad und einer Schablone gemacht. Die Ränder habe ich mit einem Signomarker betont. Da die Brillance-Stempelfarbe oft noch ganz leicht feucht ist und nur sehr schwer trocknet, habe ich die Sterne noch mit Perfect Pearls bestrichen. 

I stamped the tied man with Memento and coloured him with Copics and Polychromos. I stamped the text with Versamark and embossed it with white embossing powder. The screws on the flag are brads.

In the background I made the stars with a Brillance stamp pad and a stencil. I emphasized the edges with a Signo marker. Since the Brillance stamp pad ink is often still very slightly moist and dries only with difficulty, I coated the stars with Perfect Pearls. 


Materialliste
Supplies
Stempel / stamps: Scrapbook Forever Gefesselter Mann, Für Euch
Stempelkissen / stamp pads: Memento tuxedo black, Versamark; Brillance moonlight white
Embossingpulver / embossing powder: Stampendous! detail white
Stanzen / dies: Quickutz Arrows RS-0345
Schablonen / stencils: Scrapbook Forever Sterne
Copics Seil / Rope: E81, E84, E87, Haut / Skin: E40, E31, E13, E53, Schuhe / shoes: E53, E57, E59, E49, Tuch / Cloth: R20, R35, R29, R59, Hose / trousers: B32, B34, B37, B39, Schatten / shadow E43
Polychromos 101, 189, 131, 169, 177, 225, 120, 157, 267
Signomarker weiß 
Perfect Pearls

An den folgenden Challenges möchte ich mit meiner Karte teilnehmen.
I would like to participate into the following challenges with my card.

Mittwoch, 14. August 2019

Your dream

*** Dieser Post enthält Werbung. ***
*** This post contains advertisement. ***

Kennt ihr das? Manchmal macht es einfach nur Spaß, mit Stempeln zu spielen und zu kreieren. Das ist doch das Tolle an unsrem Hobby, gell? Aber dann hat man auch mal einen Lauf, da fühlt es sich nochmal besser an und es fühlt sich an wie Kunst. So ging es mir mit dieser Karte. Es war so schön, mit den Stempeln von Visible Image zu arbeiten und was dabei entstanden ist, ist zumindest für mich, meine Kunst. Vielleicht gefällt es Euch ja auch.
Do you know that? Sometimes it's just fun to play with stamps and create. That's the great thing about our hobby, isn't it? But then you have a run, it feels even better and it feels like art. That's how I felt with this card. It was so nice to work with the stamps of Visible Image and what came out of it is my very own art, at least for me. Maybe you will like it as well.


Zu dem Spruch möchte ich noch sagen, dass ich es ganz wichtig finde, dass man seinen Traum nicht aufgibt. Aber manche Träume hat man ja auch, weil es schön ist, sie als Traum zu haben, man weiß, dass man sie nicht verwirklicht, aber es ist schön, diesen Traum zu träumen. Behaltet auch diese unbedingt!
I would also like to say that I think it is very important that you don't give up on your dream. But you also have some dreams because it's nice to have them as dreams, you know that you won't realize them, but it's nice to dream this dream. Keep those dreams as well!

Zunächst einmal habe ich mich um meine Hauptfiguren gekümmert. Ich habe sie dreimal (ehrlich gesagt viermal, aber Nummer vier brauchte ich dann nicht) gestempelt und mit einer Schere ausgeschnitten. Eine Figur habe ich dann mit Copics, Copic Multiliner und einem Signomarker koloriert. Die anderen beiden haben Sterne aus Strukturpaste bekommen. Diese habe ich mit der Stars & Stripes Schablone von Visible Image gemacht. Ebenso habe ich die Sterne auf den Hintergrund gemacht. 

First of all, I took care of my main characters. I stamped them three times (to be honest four times, but I didn't need number four then) and cut them out with scissors. I coloured one figure with Copics, Copic Multiliner and a Signo marker. The other two got stars out of structure paste. I made them with the Stars & Stripes stencil from Visible Image. I also made the stars on the background this way.

Den Text habe ich mit Versamark gestempelt und mit schwarzem Embossingpulver embosst. 
I stamped the text with Versamark and embossed it with black embossing powder. 


Um einen schönen farblichen Hintergrund zu bekommen habe ich mit Alokoholinks gespielt. Nach dem Trocknen habe ich mit Copic opaque einige der Sterne wieder weiß gemacht, weiße Nuvo Drops zugefügt und einige Sterne aus dem Faerie Set von Visible Image mit Versafine dazu gestempelt.
To get a nice coloured background I played with Alokoholinks. After drying I made some of the stars white again with Copic opaque, added white Nuvo Drops and stamped some additional stars from the Faerie Set of Visible Image with Versafine.


Den fertigen Hintergrund habe ich auf schwarzem Grund gemattet und die Figuren mit Abstandspads aufgeklebt.
I matted the finished background on a black card and glued the figures onto it with spacer pads.


Materialliste
Supplies

Stempel / stamps: Visible Image Tree of Life, Faerie Magic, Express Yourself
Stempelkissen / stamp pads: Versamark, Versafine onyx black, Memento tuxedo black
Embossingpulver / embossing powder: Print Art Detailschwarz
Schablonen / stencils: Visible Image Stars & Stripes
Copics YR14, YR23, YR07, V01, V06, V09, BG11, BG23, BG49
Copics Multiliner 0.1, 0.5 
Copic opaque
Signo white
Nuvo Crystal Drops Gloss simply white
Alcohol Inks Ranger pool, aqua, cool perl, amethyst
EFCO Decoupaste fein


An den folgenden Challenges möchte ich mit meiner Karte teilnehmen.
I would like to participate into the following challenges with my card.

Freitag, 9. August 2019

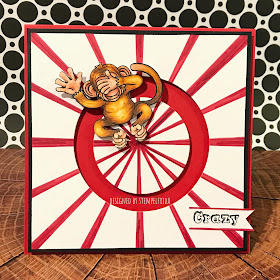
Crazy Monkey

Uiuiuiui, heute geht es aber rund hier :) Dieses kleine Äffchen turnt verrückt im Rad herum. ... ein  bisschen schwummrig scheint es ihm aber doch zu sein, oder? (Unten habe ich Euch ein Video von dieser Interaktiven Karte eingefügt).
Uiuiuiui, today we are spinning around here :) This little monkey is doing crazy gymnastics in the wheel. ... but he seems to be a little dizzy, doesn't he? (Below I have inserted a video of this interactive card for you).

Diese interaktive Karte ist recht einfach zu machen. Zunächst habe ich das Design vorne gemacht. Dazu habe ich die Linien mit Copics gezogen und an den Rändern etas breiter gemacht. In dieses Cover stanzt Ihr zwei Kreise. Die Größe ist davon abhängig, wie groß Eure Karte ist und wie breit das Teil ist, das Ihr hinter den Affen (oder Euer Objekt) setzt. Meine Karte ist 15x15 cm und hinter meinem Affen habe ich zwei 5 Cent Münzen benutzt und dazwischen zwei kleine Magnete. Die Kreise waren 6,3 und 8,9 cm groß. Es ist wichtig, dass Ihr hinter dem Objekt, das sich drehen soll etwas Schweres nehmt, damit es sich auch schön dreht. Die Münzen waren dazu ideal. Bei mir könnte man das Äffchen auch noch nachträglich gegen etwas anderes tauschen, da zwischen den Münzen zwei dünne runde Magnete sind. Zur Befestigung des Äffchens auf der Münze habe ich Glossy Accents verwendet. Zur Montage müsst Ihr natürlich darauf achten, dass die Abstandspads für das Cover und den Kreis in der Mitte dicker sind als das, was Ihr hinter dem Äffchen anbringt. Ich habe 3 mm Pads benutzt.
Mein Äffchen habe ich mit Memento gestempelt und dann mit Copics und Polychromos koloriert. Witziger Weise habe ich herausgefunden, dass man auch auf Exacompta Papier mit Copics arbeiten kann, obwohl es nicht so eine glatte Oberfläche besitzt.

This interactive card is quite easy to make. First I made the design for the front. I drew the lines with Copics and made them wider towards the edges. You then punch two circles into this cover. The size depends on how big your card is and how wide the part you put behind the monkey (or your object) is. My card is 15x15 cm and behind my monkey I used two 5 Eurocent coins and between them two small magnets. The circles were 6.3 and 8.9 cm. It is important that you take something heavy behind the object you want to rotate so that it spins well. The coins were ideal. With my card one could exchange the monkey against something else later, if you like, since between the coins there are two thin round magnets. To fix the monkey on the coin I used Glossy Accents. You need to make sure your distance pads to mount the front cover and the circle are thicker than what you put behind your rotating object. In my case I used 3 mm pads.
I stamped my monkey with Memento and then coloured it with Copics and Polychromos. Funnily enough, I found out that you can also work with Copics on Exacompta paper, although it doesn't have such a smooth surface.


Und hier ist noch ein Video zur Karte:
 This is a video from my card:


Materialliste
Supplies
Stempel / stamps: Scrapbook Forever Affenbande, Grunge Kleckse #2
Stempelkissen / stamp pads: Memento tuxedo black; Versafine onyx black

Stanzen / dies: Quickutz CC-SHAPE-14-024 nesting circles (6.3 cm; 8.9 cm)
Copics 100, R37, YR21, YR23, YR27, E37, E79, E11, E15, E19, E93
Polychromos 131, 190, 187, 180, 169, 177 
Glossy Accents

An den folgenden Challenges möchte ich mit meiner Karte teilnehmen.
I would like to participate into the following challenges with my card.
Through the Purple Haze
Challenge #158 - Inspired by a song
Do you know the song from "Dead or Alive": You spin me right round baby (like a record baby...) 
 
Through the Craftroom Door
Challenge August 6 - Anything goes
Creative Moments
Challenge #174 - Anything goes

*** Dieser Post enthält Werbung. ***
*** This post contains advertisement. ***