Seiten

Freitag, 29. Oktober 2021

99% Chance of wine

 *** Dieser Post enthält Werbung. ***

*** This post contains advertisement. ***

Ich glaube, dieser Visible Image Release ist wie für mich gemacht: Wein-, Gin-, Bier-Stempelsets, hihihi. Fangen wir doch erst einmal mit der Weinedition an. Neben Weinglas, Korken, Weinflasche und passenden Sprüchen gibt es aber auch vor allen Dingen: sich bewegender Wein - Splash!!!! 

I think this Visible Image release is made for me: wine, gin, beer stamp sets, hehehe. Let's start with the wine edition first. In addition to wine glass, cork, wine bottle and matching sayings, there is also above all: moving wine - Splash!!!!
 
 
Zunächst steht das Glas noch ganz jungfräulich und unschuldig da, so ungefüllt - gestempelt mit Versamark und embosst mit einem mint-farbenen Embossingpulver.
At first, the jar is still quite virginal and innocent, so unfilled - stamped with Versamark and embossed with a mint-colored embossing powder.

Doch dann - wusch!, der Wein fegt um die Ecke - embosst in einem bordeauxrot-Farbton. Die Frau im Hintergrund bewegt sich mit der Weinwelle - oder tanzt sie?
But then - whoosh!, the wine sweeps around the corner - embossed in a burgundy hue. The woman in the background moves with the wine wave - or is she dancing?

 
Den Rahmen für die Szene habe ich mit dem Korkenstempel gemacht, den ich mit Memento gestempelt und mit Copics koloriert habe. Das Wort "Wine" habe ich in weiß embosst. 
I made the frame for the scene with the cork stamp, which I stamped with Memento and colored with Copics. The word "wine" is embossed in white.

 
Den Hintergrund habe ich mit einigen Spritzern, die ich mit Distress Oxides gestempelt habe, versehen. 
I added some splatters to the background, which I stamped with Distress Oxides.


Den ganzen neuen Release könnt Ihr Euch schon auf der Visisble Image Seite ansehen. Noch ist er in der Vorbestellung. 
You can see the whole release on the Visible Imgage page. It is still in pre-order.
 
Visible Image 

Materialliste
Supplies
 
 
Stempel / stamps: Visible Image 99% Chance of wine, Hip Hop Girls 


Stempelkissen / stamp pads: Versamark; Distress Oxides aged mahogany, ground espresso, victorian velvet; Memento rich cocoa
Embossingpulver / embossing powder: PearLustre hessonite; Stempelträume perlmutt grün; Wow opaque bright wihte super fine
Polychromos 133, 154
Copics E31, E33, E57

An den folgenden Challenges möchte ich mit meiner Karte teilnehmen.
I would like to participate into the following challenges with my card.
GRAB OUR BADGE

Mittwoch, 27. Oktober 2021

Gast-Design bei der Create A Smile Challenge

 *** Dieser Post enthält Werbung. ***

*** This post contains advertisement. ***

Ach, was habe ich mich gefreut als meine Karte kürzlich zum Gewinner der letzten Create A Smile Challenge gekürt wurde. Hier geht es zum entsprechenden Post (KLICK). Und das bedeutete für mich nicht nur, dass ich einen Gutschein für neue Goodies bekommen habe, sondern ich darf auch bei der heute startenden Challenge Gastdesignerin sein. 
 
Oh, how happy was I when my card was recently chosen as the winner of the latest Create A Smile Challenge. Click here to read the corresponding post (CLICK). And that meant for me not only that I got a voucher for new goodies, but I also get to be a guest designer in the challenge that starts today.
 

Die Challenge ist etwas zu kreieren, welches von diesem Mood Board inspiriert wurde. HIER kommt Ihr zum Challenge Blog.
 
The challenge is to create something inspired by this mood board. You can get to the challenge blog HERE


Mein Inspirationsgedanke
Die Sprüdosen unten rechts im Bild haben mich direkt an die Totenköpfe erinnert, die ich mir letztens gekauft hatte, aber noch nicht die Chance hatte, sie zu benutzen. Das war DIE Chance. Ich habe die Farben der Sprüdosen übernommen und auch den hellen Rand. Außerdem findet Ihr auf der Karte das versteckte Dreieck-Muster der Sprühdosen wieder. Dann wollte ich keinen Fliegenpilz machen, obwohl ich ihn so liebe, aber ich dachte, das machen bestimmt einige. Trotzdem konnte ich es mir nicht nehmen lassen, die Punkte auf meinem Tag unterzubringen. Ein weiteres verspieltes Element findet Ihr in dem Wellenrand des Tags und der weißen Grund, welches durch die Blätter inspiriert ist. Und dann habe ich noch den bordeaux-farbenen Streifen auf meiner Karte platziert. 
 
My inspiration path
The spray cans in the bottom right of the picture reminded me directly of the skulls I bought the other day but haven't had a chance to use yet. This was THE chance. I adopted the colors of the spray cans and also the light rings. You'll also find the hidden triangle pattern of the spray cans on the card again. Then I didn't want to do a toadstool, even though I love it so much. I was convinced, many would go for this element. Still, I couldn't resist putting the dots on my tag. You'll find another playful element in the scalloped edges of the tag and on the white base, which was inspired by the leaves. And then I also placed the burgundy stripe on my card.   

Die Totenköpfe habe ich mit Versamark auf Kraftkarton gestempelt, in weiß embosst und mit Polychromos koloriert. Der weiße Grund ist Stanzen von Create A Smile gestanzt, ebenso wie die Ränder des ehemals graden Tags. Der Spruch entstammt dem Stempelset "Berliner Schnauze".

I stamped the skullx with Versamark on cradstock and embossed them with white powder. The white base and the formerly straight edges of the tag are die-cut with dies from Create A Smile. The saying comes from the stamp set "Berliner Schnauze" and is a Berliner dialect for "There you go".
 

Materialliste
Supplies
Stempel / stamps: Create A Smile Sugar Skulls, Berliner Schnauze
Stempelkissen / stamp pads: Versamark; Distress Oxides ground espresso
Embossingpulver / embossing powder: Wow opaque bright withe super fine
Stanzen / dies: Create A Smile Frames, Borders; Sizzix Tags
Polychromos 101, 103, 107, 108, 111, 186, 283, 177, 180, 115, 117, 217, 175, 174, 172, 168
Sakura 1.0


An den folgenden Challenges möchte ich mit meiner Karte teilnehmen.
I would like to participate into the following challenges with my card.
Blog Badge
Grab Our Badge
Banner zum mitnehmen

Mittwoch, 20. Oktober 2021

Ballonfahrt - Neue Challenge bei Stamp Corner

 *** Dieser Post enthält Werbung. ***

*** This post contains advertisement. ***

Ja guckt Euch das an! Da hatte ich doch letztens einen Elefantenluftballon gezaubert und jetzt gibt es ab November dieses Stempelset mit süßen Hasen bei Stamp Corner, von denen einer Ballon fährt. Na, so ein Zufall! Ich hatte den Luxus eines Bastelnachmittags und somit ganz viel Zeit, mich einer ausgiebigen Koloration zu widmen. 
 
Oh, look at that! I had made myself an elephant balloon the other day and now there is  this stamp set with cute bunnies from November on at Stamp Corner, one of which rides on a balloon. Well, what a coincidence! I had the luxury of a crafty afternoon and so I had much time to devote myself to an extensive coloring.
 
 
Das Motiv habe ich mit Ink on 3 gestempelt und dann mit Copics koloriert. Mehr Tiefe und Details habe ich dann mit Polychromos ausgearbeitet. Einige Reflektionen habe ich mit weißem Sakurastift gemalt.
 
I stamped the motif with Ink on 3 and then colored it with Copics. I then worked out more depth and details with Polychromos. Some reflections I painted with a white Sakura pencil.
 

Den Hintergrund habe ich ebenfalls mit Copics gemalt. Dazu habe ich jeweils die Pinselspitzen von verschiedenen Gelb- und Orange-Tönen von der Mitte nach aussen aufgetupft. Die Blätter an der Schrift und die Beeren sind auch mit Copics gemalt. 

I also painted the background with Copics. To do this, I dabbed the brush tips of different shades of yellow and orange from the center to the outside. The leaves on the font and the berries are also painted with Copics.
 
 
Heute startet wieder eine neue Challenge auf dem Stamp Corner Blog für Euch. Das Thema lautet Herbstfarben. Spielt Ihr dieses Mal mit? Hier bekommt Ihr alle Informationen (KLICK). 

Today starts a new challenge on the Stamp Corner blog for you. The theme is colours of autumn. Are you going to play along? All information can be found here (CLICK).
 

Materialliste
Supplies
Stempel / stamps: Stamp Corner SC-PS-0131 Baby Bunny 2, SC-PS-0112 Fauli
Stempelkissen / stamp pads: Ink on 3
Stanzen / dies: Create A Smile Rahmen, Rahmen gewellt
Copics YG00, YG95, YG99, E01, E19, E29, E97, R02, R08, E59, YR23, YR27, E37, E79, Y00, Y06, Y08, Y17, YR04, Y02, YR82, YR07
Polychromos 101, 105, 107, 108, 113, 117, 217, 194, 188, 233, 182, 177
Sakura 0.8, 1.0

An den folgenden Challenges möchte ich mit meiner Karte teilnehmen.
I would like to participate into the following challenges with my card.

Please grab our logo
 

Mittwoch, 13. Oktober 2021

Auszeit für Dich

 *** Dieser Post enthält Werbung. ***

*** This post contains advertisement. ***

Wann hast Du Dir das letzte Mal eine Auszeit gegönnt? 

When was the last time you allowed yourself some time off?
 
 
Ach, Ihr wisst ja mittlerweile, dass ich ein großer Fan dieses Elefanten-Stempelsets bin. Nach einem Elefanten auf dem Sofa kam der Elefanten-Ballon. Jetzt gönnt sich der Elefant mal eine Auszeit. Das darf jeder mal. Und es ist so wichtig! Schaut mal, er hat die Kaffeetasse bereits in der Hand und ich bin mir sicher, gleich landet er wieder auf meinem Sofa! Na so ein Schlingel. Aber es sei ihm gegönnt, hihihi.
 
Oh, you know by now that I'm a big fan of this elephant stamp set. After an elephant on the sofa came the elephant balloon. Now the elephant is taking a break. Everyone gets to do that once in a while. And it's so important! Look, he already has the coffee cup in his hand and I'm sure he's about to land on my sofa again! What a rascal. But it is deserved by him, hihihi. 
 
 
Ich habe den Elefanten mit Ink on 3 gestempelt, mit Copics und Polychromos koloriert und von Hand mit einer Schere ausgeschnitten. 
Den Tag habe ich  mit einer Stanze ausgestanzt. Das Muster habe ich mit einer Schablone gemacht. Dafür habe ich durch die Schablone durch mit einem großen Schwamm in zwei Farben Kreise mit Distress Oxides gemacht. Anschließend habe ich noch Wasserspritzer drauf gegeben. 
Für weitere Dekoration meiner Karte habe ich noch Stanzteile auf das Tag geklebt (das ist ein abgeschnittenes Oval) und hinter dem Tag befestigt (das sind Herzen) und auch der Text ist auf ein ausgestanztes Label gestempelt.

I stamped the elephant with Ink on 3, colored it with Copics and Polychromos and fuzzy-cut it. I die-cut the tag. I made the pattern with a stencil. For this I made circles through the stencil with a big sponge in two colors with Distress Oxides. Afterwards I added water splashes on it. To add some decoration on my card, I glued die cuts to the tag (which is a cut oval) and attached hearts behind the tag. The text is stamped on a die cut label.


Materialliste
Supplies
Stempel / stamps: Stamp Corner SC-PS-0128 töörööö, SC-PS-0062
Stempelkissen / stamp pads: Ink on 3; Distress Oxides frayed burlap, ripe persimmon
Stanzen / dies: Sizzix 660222 Scribbles & Splat; My Favourite Things Die-namics Blueprints 2; 132420 BXAT-XD-BW, 128331 BXAT-AX-BX
Schablonen / stencils: Stamp Corner SC-ST-21002
Copics0, E59, R0000, R00, R02, R05, BG90, BG93, BG95, BG99
Polychromos 101, 130,223, 172, 174, 178
Sakura 0.8 


An den folgenden Challenges möchte ich mit meiner Karte teilnehmen.
I would like to participate into the following challenges with my card.

Want our Badge

Sonntag, 10. Oktober 2021

Mein Elefanten-Ballon

 *** Dieser Post enthält Werbung. ***

*** This post contains advertisement. ***

Ich habe mir einen Elefanten-Luftballon gebastelt. Der Elefant verlockt irgendwie, dass man ihn vor ein Fenster setzt und er hinaus schauen kann. Ich dachte mir, lass ihn doch noch weiter in die Ferne schauen und so kam die Idee mit dem Ballon.
 
I made myself an elephant balloon. The elephant somehow tempts you to put him in front of a window so he can look out. I thought, let him look even further into the distance and so came the idea with the balloon.
 
 
Den süßen Elefanten habe ich mit Ink on 3 gestempelt und mit Aquarellfarben koloriert. Danach habe ich ihn von Hand ausgeschnitten. Für den Hintergrund habe ich aus einem weißen Karton das Wort Friend ausgestanzt und es mit einem grünen, leicht strukturierten Karton hinterlegt. Ich habe Pailetten aufgeklebt und orange farbene Punkte gemalt. An das "N" von Friend habe ich das Band angeknüpft, hinter dem Elefanten festgeklebt und ihn dann mit Abstandspads befestigt. 


I stamped the cute elephant with Ink on 3 and colored it with watercolors. After that I fussy-cut him. For the background, I cut out the word Friend from a white cardstock with a die and backed it with a green, slightly textured cardstock. I glued on sequins and painted orange dots. I tied the ribbon to the "N" of Friend, stuck it behind the elephant and then attached it with spacer pads.
 
 
Materialliste
Supplies
Stempel / stamps: Stamp Corner SC-PS-0128 töörööö
Stempelkissen / stamp pads: Ink on 3
Stanzen / dies: MFT-1925 Friend
Aquarellfarbe
Sharpie orange
Sakura 0.8
United Office Permanent Marker

An den folgenden Challenges möchte ich mit meiner Karte teilnehmen.
I would like to participate into the following challenges with my card.


Freitag, 8. Oktober 2021

Christmas Joy

 *** Dieser Post enthält Werbung. ***

*** This post contains advertisement. ***

Bei Visible Image tauchen wir für einige Zeit in die Vorbereitungen auf Weihnachten ein. Das Designteam zeigt Euch Inspirationen für Eure Weihnachtspost und Weihnachtsdeko. Heute habe ich eine DIN A5 Karte für Euch gestaltet. 

At Visible Image, we're diving into Christmas preparations for a while. The design team shows you inspirations for your Christmas mail and Christmas decorations. Today I have designed a DIN A5 card for you.
 
 
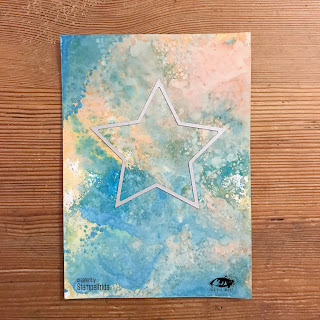
Aus einem Hintergrund, den ich mit Distress Oxides Sprays gemacht hatte, habe ich zunächst einen Stern ausgestanzt. 
 
I first die-cut a star from a background I had made with Distress Oxides Sprays. 

 
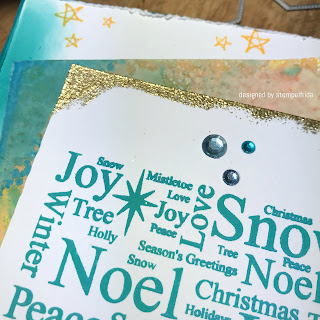
Auf einem weiteren Stück weißen Karton habe ich den Weihnachtstext-Hintergrund-Stempel in einem türkis-Ton gestempelt. An den Kanten habe ich ganz grob mit dem Versamark Stempelkissen ein wenig Kleber aufgetragen und mit einem glitzernden goldenen Pulver embosst. Ich habe einige Glitzersteine aufgeklebt, ein goldenes Band darum gebunden und den ausgestanzten Stern mit Abstandspads befestigt. 
 
On another piece of white cardstock I stamped the Christmas text background stamp in a turquoise tone. On the edges I applied a little glue very roughly with the Versamark stamp pad and embossed with a glittery gold powder. I adhered some gems, tied a gold ribbon around it and attached the star with spacer pads.  

 
Auf ein drittes Papier habe ich die Sterne aus dem Set "O Christmas Tree" in orange als Hintergrund verteilt gestempelt. Die Ränder habe ich mit einem Grunge-Tool abgerieben und ein wenig geknufft. Außerdem habe ich hier und dort türkisfarbene Stempelfarbe aufgetragen. 
 
On a third paper I stamped the stars from the set "O Christmas Tree" in orange distributed randomly as background. I rubbed the edges with a grunge tool and scrunched them a little. I also applied turquoise stamp ink here and there. 


Die drei Schichten habe ich versetzt übereinander auf eine türkisfarbene Karte geklebt. 
 
Then I attached the three layers a bit twisted on top of each other.

Visible Image 

SHOP

Materialliste
Supplies
 
 
Stempel / stamps: Visible Image Christmas Backgrounds, O Christmas Tree 


Stempelkissen / stamp pads: Distress Oxides peacock feathers, wild honey; Versamark
Embossingpulver / embossing powder: Hein Design super gold
Distress Oxides Spray mermaid lagoon, squeezed lemonade, spiced marmelade
Making Memories Grunge Tool

 
An den folgenden Challenges möchte ich mit meiner Karte teilnehmen.
I would like to participate into the following challenges with my card.


I used Ribbon, Wording, Gems
 

Samstag, 2. Oktober 2021

Originals Only Day 2021 - stempelfrida is with the party

 *** Dieser Post enthält Werbung. ***

*** This post contains advertisement. ***

Die Karte von heute liegt mir ganz besonder am Herzen. Und so findet Ihr auch Elemente darauf, die sich für mich besonders gut anfühlen. Also in meinem Innern. Einkuscheln und Pilze. Von meiner Liebe oder Faszination für Pilze habe ich  ja schon das ein oder andere Mal berichtet und ich denke, das mit dem Einkuscheln ist selbst erklärend. Warum aber ist diese Karte von heute von solcher Bedeutung? Es ist #OriginalsOnlyDay2021
 
Today's card is very special to me. And so you will find elements on it that feel good to me. Inside of me, I mean. Snuggle up (that´s what the text says) and mushrooms. I have already told the one or the other time from my love or fascination for mushrooms and I think that thing with the snuggle is self-explanatory. But why is this card from today of such significance? It is #OriginalsOnlyDay2021


Gaaaanz viele kreative Menschen werden heute Werke zeigen mit Original-Produkten. Dabei ist die Firma ganz egal - Hauptsache, es ist ein Original! Wir wollen ein Zeichen gegen Raubkopien setzen. Auf diesem Blog findet Ihr die ganzen Informationen: KLICK
#isupportdesignnotcrime 

Soooooo many creative people will show works with original products today. It does not matter, which company they are  from  - Just this: They are originals! We want to set a sign against piracy. You can find all information on this blog: CLICK
#isupportdesignnotcrime

Für meine Karte habe ich Produkte der Firma Create A Smile verwendet. Eine Firma, die ich unglaublich schätze für ihre Ideen, Kreativität, Persönlichkeit, Herzlichkeit, Informationen, Kommunikation, Herzblut, Wärme und die wundervollen Produkte. 
 
For my card I used products from the company Create A Smile. A company that I appreciate incredibly for their ideas, creativity, personality, heartiness, information flow, communication, passion, warmth and the wonderful products.


Wie ich die Karte gemacht habe

Jetzt sei aber noch erklärt, wie ich meine Karte gemacht habe. Denn einige kennen vielleicht die Pilze, das ist nämlich eine Schablone. Ich habe sie über meinem weißen Karton fixiert und den unteren Bereich abgedeckt. Dann habe ich jeden einzelnen Pilz erst unten abgedeckt und die Kappe mit einem Pinsel hellgrün und an den oberen Rändern dunkelgrün gewischt, dann das gleiche mit den Stielen gemach, indem ich die Kappen jeweils abgedeckt habe. 
Nachdem ich die Schablone entfernt habe, habe ich die Pilze einzeln noch mit Polychromos und Sakurastift im Detail koloriert.

Unter die Szene habe ich ein Washitape mit Holzmuster geklebt. Der Schriftzug ist mit Versamark auf ein Designpapier gestempelt und in weiß embosst. Die Rahmen habe ich zweimal gestanzt und versetzt auf die Karte geklebt. Der Spruch ist zum Schluß mit Abstandspads fixiert.
 

How I made the card

But now I still want to explain how I made my card. Because some may know the mushrooms, that is in fact a stencil. I fixed it over my white cardstock and covered the bottom. Then I covered each mushroom at the bottom first and wiped the cap light green with a brush and dark green on the top edges, then did the same with the stems, covering the caps of each.
After I removed the stencil, I colored each of the mushrooms individually with Polychromos and a Sakura pen for the details.


Under the scene I glued a Washitape with wood pattern. The lettering is stamped with Versamark on a design paper and embossed in white. I have die-cut the frames twice and glued them offset on the card. The saying is fixed last with spacer pads.


Materialliste
Supplies
Stempel / stamps: Create A Smile Winterliche Grüße
Stempelkissen / stamp pads: Versamark; Distress Oxides bundled sage, peeled paint, tea dye, vintage photo
Embossingpulver / embossing powder: Wow! Opaque bright white super fine
Stanzen / dies: Create A Smile Rahmen
Schablonen / stencils: Create A Smile Pilze
Polychromos 101, 182, 179, 177, 168, 173
Sakura 1.0

An den folgenden Challenges möchte ich mit meiner Karte teilnehmen.
I would like to participate into the following challenges with my card.

Simon Says Stamp - Wednesday Challenge