Seiten

Samstag, 31. Oktober 2020

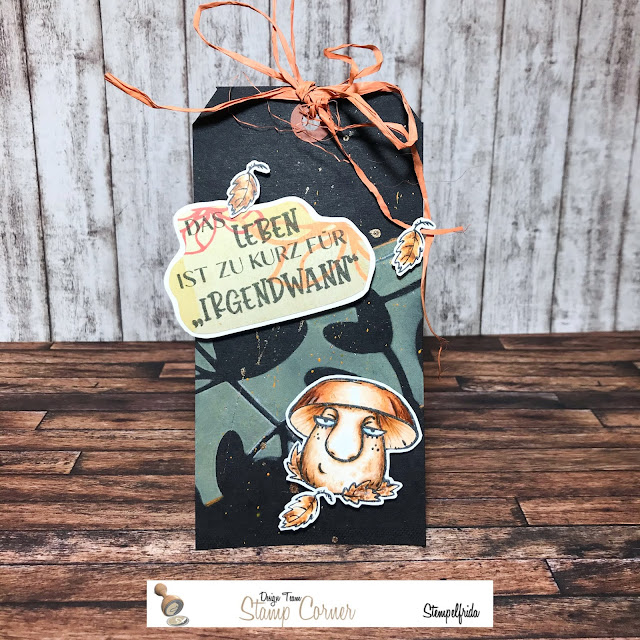
Das Leben ist zu kurz für Irgendwann

 *** Dieser Post enthält Werbung. ***

*** This post contains advertisement. ***

Oh, was habe ich mich gefreut, als ich das Pilz-Stempelset gesehen habe, welches es ab morgen bei Stamp Corner geben wird. Es enthält nämlich viele verschiedene Pilze und dabei nicht nur die üblichen Verdächtigen. Der kleine Dicke hier ist doch wohl auch ein besonders schönes Exemplar, oder?
Und er kommt mit einer gaaaanz wichtigen Botschaft für Euch! "Das Leben ist zu kurz für Irgendwann!" Denkt bitte immer daran!
 
Oh, I was so happy when I saw the mushroom stamp set that will be available at Stamp Corner starting tomorrow. It contains many different mushrooms and not only the usual suspects. The little fat one here is also a very nice one, isn't he?
And he comes with a very important message for you! "Life is too short for Sometime!" Please always remember that!


Der Tag ist ein vorgestanzter. Ich habe mal ein Päckchen geschenkt bekommen und erst selten oder vielleicht gar noch nie benutzt. Irgenwie fand ich den schwarzen Untergrund für den dicken Pilz sehr passend. Mit einer Schablone habe ich Distress Oxides aufgetragen. ... seit Neustem gibt es übrigens auch Stamp Corner Schablonen! Anschließend noch mit zwei Acrylfarben Spritzer drauf gemacht. 
Den Pilz und die Blätter habe ich mit Ink on 3 gestempelt und mit Copics sowie Polychromos koloriert. Den Text habe ich mit Distress Oxides auf ein Stück Designpapier gestempelt. Ich habe es ausgeschnitten und auf weißen Karton geklebt. Danach habe ich es nochmals ausgeschnitten, so daß es gut zu den anderen Motiven passte. 

The tag is a pre-made one. I once got a package as a gift and used it only rarely or maybe never ever before. Somehow I found the black background very suitable for the thick mushroom. With a stencil I applied Distress Oxides to it. Afterwards I added some splashes with two acrylic colors.
I stamped the mushroom and the leaves with Ink on 3 and colored them with Copics and Polychromos. I stamped the text with Distress Oxides on a piece of design paper. I cut it out and glued it on white cardboard. After that I cut it out again, so that it fitted well to the other motives. 
 

Materialliste
Supplies
Stempel / stamps: Stamp Corner SC-PS-0086, SC48370025
Stempelkissen / stamp pads: Ink on 3; Distress Oxides black soot, wild honey
Schablonen / stencils: SC-ST-21006
Copics 0, BV52, E30, E53, E35, E99, E37, E57, YR12
Polychromos 101, 103, 111, 169, 180, 280

An den folgenden Challenges möchte ich mit meiner Karte teilnehmen.
I would like to participate into the following challenges with my card.

Banner zum mitnehmen

Freitag, 30. Oktober 2020

Mein Monat 2020-09

... Aber diesen Monat schaffe ich es mit der Kollage des Vormonats. ... naja, noch grade so, gell?

... But this month I make it with the collage of the former month. ... well just in time, right?


Leider war in den letzten Wochen bei mir arbeitstechnisch so viel zu tun, so dass ich nicht viel in meinem Bastelzimmer werken konnte. Das werdet Ihr dann wohl bei der nächsten Kollage zu sehen bekommen. Dieses Mal sind neun Werke zusammen gekommen. Zwei davon sind herbstliche Karten in den für mich typischen Herbstfarben. Sie sind mit Tieren aus dem Wald. Ich liebe Tiere aus dem Wald und auch Herbstfarben und ich denke das kann man wohl auch an den Karten erkennen, oder? Noch mehr Farben hat die Karte oben links. Mit ihr habe ich Euch die Technik erklärt, wie man einen Alkoholink-Hintergrund auf ein normales Papier übertragen kann. 
Der Hauptteil meiner Karten sind bereits Weihnachtskarten. Das liegt daran, dass sowohl bei Stamp Corner als auch bei Visible Image neue Weihnachtsstempel in das Sortiment eingezogen sind. Eine Freundin schrieb mir, dass sie durch Covid jetzt ja kaum etwas machen kann außer Stempeln und so wird sie dieses Jahr schon ganz frühzeitig ihre Weihnachtspost fertig haben. .... Na, das schaut bei mir anders aus, denn oft verschicke ich meine Beispielkarten, weil sie für das Fernsehen oder Live-Shows auf Facebook benötigt werden.

Unfortunately there was so much work to do in the last weeks, that I could not do much in my craft room. You will probably see this in the next collage. This time nine pieces came together. Two of them are autumnal cards in my typical autumn colors. They are with animals from the forest. I love animals from the forest and also autumn colors and I think you can probably tell that from the cards, right? The card in the upper left corner has even more colors to it. With that card I explained to you the technique how to transfer an alcoholink background onto a normal paper. 
The main part of my cards are already Christmas cards. This is because both Stamp Corner and Visible Image have added new Christmas stamps to their assortment. A friend of mine wrote me that in these Covid times she can't do much more than stamping, so she will have her Christmas mail ready early this year. .... Well, that looks different for me, because often I send my sample cards to the companies, because they are needed for TV or live shows on Facebook.


Ich möchte auch diese Kollage wie immer bei Anna´s Art von Ingrid verlinken.
As always I would like to link also this collage at Anna´s Art from Ingrid.


Herzlich Eure / Kind regards from

stempelfrida

Freitag, 23. Oktober 2020

Transience - Vergänglichkeit

 *** Dieser Post enthält Werbung. ***

*** This post contains advertisement. ***

Die Schmetterlinge sind wohl schon in die Winterruhe gegangen, aber ich möchte ihnen  hier nochmal eine Karte widmen bevor der Winter kommt. Vielleicht habe ich daher auch zu winterlichen Farben gegriffen. Aber der Schmetterling versinnbildlicht auch die Vergänglichkeit. Daher denkt dran, lebt JETZT, lasst jeden Moment wichtig sein. Denkt nicht zu sehr über die Zukunft nach und auch nicht über die Vergangenheit - sonst werdet Ihr immer das JETZT verpassen.
 
The butterflies have probably already gone into hibernation, but I would like to dedicate a card to them here again before the winter comes. Maybe that's why I have chosen winter colors. But the butterfly also symbolizes transience. So remember, live in the NOW, make every moment count. Don´t think about future nor the past too much - otherwise you will always miss the NOW. 


Der Schmetterling ist eine Schablone. Ich habe ihn mit Distress Oxides in drei Farbtönen auf schwarzem Papier gewischt. Ebenso habe ich die Spritzer mit Acrylfarbe gemacht, als die Schablone noch auf dem Papier lag. Nachdem alles sehr gut getrocknet war habe ich die Texte einmal in schwarz und unten in weiß embosst. 
 

The butterfly is a stencil. I wiped it with three tones of Distress Oxides on black paper. I left the stencil on the paper and made splatter with acrylic ink. After everything dried really well I embossed the texts in black and the one on the bottom in white. 


Die Stempel und Schablone sind von Visible Image.
Stamps and stencil used are available at Visible Image.
 Visible Image

Materialliste
Supplies


Stempel / stamps: Visible Image Somwhere in time 
 
Stempelkissen / stamp pads: Versamark; Distress oxides tumbled glass, mermaid lagoon, cracked pistacchio
Embossingpulver / embossing powder: Stampendous! detail white; Print Art detail black 
Schablonen / stencils: Visible Image Butterfly Ink

An den folgenden Challenges möchte ich mit meiner Karte teilnehmen.
I would like to participate into the following challenges with my card.

My B is for butterfly
little red wagon
I used wet embossing .... that reminds me to use dry embsossing more often :) 


Dienstag, 20. Oktober 2020

Lawn Fawn Shutter Card with snow globe

 *** Dieser Post enthält Werbung. ***

*** This post contains advertisement. ***

Heute startet für Euch eine neue Challenge auf dem Stamp Corner Challenge Blog. Wir haben das Thema Weihnachten für Euch ausgesucht. Macht Ihr mit? Weihnachtskarten brauchen wir ja alle bald, gell?
 
Today starts a new challenge for you on the Stamp Corner challenge blog. We thought to give you the theme Christmas. Are you in? We all need Chrsitmas cards soon, right?   

Der Grundkörper meiner Karte ist die Shutter Card von Lawn Fawn. Ich habe sie mit Designpapier dekoriert. Das Bild im Zentrum ist mit Ink on 3 gestempelt und mit Copics koloriert. Im Hintergrund und an den Seiten habe ich Schnee und Punkte mit einem Signomarker gemalt.

The basis of my card is a shutter card from Lawn Fawn. I decorated it with design paper. The picture in the center is stamped with Ink on 3 and coloured with Copics. I painted snow in the background and dots on the side panels with a white Signo marker. 


Die neuen Stanzen von Lawn Fawn sind einfach herrlich. Damit kann man wirklich recht einfach solch eine klasse Karte mit dem Wow-Effekt machen. Wenn sie geschlossen ist, umgibt sie eine Banderole. Beim Aufklappen öffnet sich ein Fenster in der Mitte hinter dem das zentrale Motiv zum Vorschein kommt. 

The new dies from Lawn Fawn are simply gorgeous. With them you can relatively easily make such a great card with the wow-effect. When it is closed, a banderole surrounds it. When you open it, a window opens in the middle, behind which the central motif appears.


Ich habe auch ein kleines Video für Euch gemacht. Darin kann man die Shutter Card und den Mechanismus noch besser sehen. 
 
I also made a little video for you. Here you can see the shutter card well and also watch how the mechanism works. 


Materialliste
Supplies
Stempel / stamps: Lawn Fawn Snow Globe Scenes LF2427
Stempelkissen / stamp pads: Ink on 3
Stanzen / dies: Lawn Fawn LF 2428, Shutter Card Snow Globe Add On LF 2434, Shutter Card LF2432
Copics 0, G40, G17, YG25, N4, RV14
Signo Marker weiß


An den folgenden Challenges möchte ich mit meiner Karte teilnehmen.
I would like to participate into the following challenges with my card.
 
Crafty Catz Challenge Blog Badge
Grab my badge!
<b>Blog Badge</b>

Donnerstag, 15. Oktober 2020

Basteltraum-Challenge #94 - Hintergrund

 *** Dieser Post enthält Werbung. ***

*** This post contains advertisement. ***

Auf dem bastel-traum Blog haben wir ab heute eine neue Challenge für Euch. Wir möchten einen besonderen Hintergrund sehen. Dabei könnt Ihr Eurer Fantasie freien Lauf lassen. Es ist komplett egal, was Ihr verwendet. Wir sind schon so gespannt, was Ihr alles so machen werdet! 
 
On the bastel-traum blog we have a new challenge for you. We would love to see a special bakcground. And you can set your fantasy free and create anything you want to. It is open to you what you use for it. We are so excited to see all your beautiful creations.
 

Für meinen Hintergrund habe ich mir eine Maske geschnitten und damit den unteren Teil meines Hintergrunds abgedeckt. Den oberen Bereich habe ich mit drei verschiedenen Tönen Distress Oxides mit Pinseln gewischt. Ich habe Wasserspritzer drauf gegeben und zusätzlich weiße Punkte mit einem Acrylstift gemalt. Darauf habe ich anschließend die Sterne geklebt, die eigentlich als Schüttelkarten Elemente gedacht sind. Sie gehören zu der tollen Serie von Lawn Fawn mit der Schneekugel. 

Mein Motiv habe ich mit Ink on 3 gestempelt und mit Copics koloriert. Die Ränder an meiner Schneekugel unten und am Schildchen habe ich mit Distress Oxides eingefärbt.

For my background I cut a mask to cover the lower part of my background. I wiped the upper part with three different shades of Distress Oxides with brushes. I put water splashes on it and additionally painted white dots with an acrylic pen. Afterwards I glued the stars on top of them, which are actually meant to be shake card elements. They belong to the great series of Lawn Fawn with the snow globe.

I stamped my motif with Ink on 3 and colored it with Copics. The edges at the bottom of my snow globe and on the sign I shaded with Distress Oxides.

Pssst.... habt Ihr es gemerkt? Ich habe versucht, den Schneehorizont im Hintergrund dem in der Schneekugel anzupassen.

Shhhh.... did you realize? I tried to align my horizon of the background the one in the snow globe. 


Vergesst nicht: Macht einen Hintergrund und verlinkt Euer Werk auf dem bastel-traum blog
 
Don´t forget to link your background project to the bastel-traum blog
  
Challenge #94 - Hintergrund
challenge #94 - background


Materialliste
Supplies
Stempel / stamps: Lawn Fawn Snow Globe Scens LF2427
Stempelkissen / stamp pads: Ink on 3; Distress Oxides milled lavender, stormy sky, shaded lilac
Stanzen / dies: Lawn Fawn Snow Globe Scenes Shaker Add On LF 2429, Shutter Card Snow Globe Scenes Add On LF 2434 
Copics 0, R81, BV00, B65, B32, BG72, BG75, BG78
Copic Opaque 
Marker Stampin Up basic grey

An den folgenden Challenges möchte ich mit meiner Karte teilnehmen.
I would like to participate into the following challenges with my card.
Blog Badge
Blog Badge
Grab Our Badge

Sonntag, 11. Oktober 2020

Snowman boxes

 *** Dieser Post enthält Werbung. ***

*** This post contains advertisement. ***

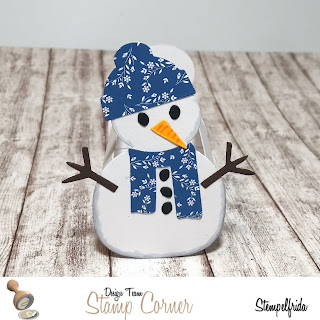
Hallo, Ihr Lieben, heute komme ich mal mit etwas Süßem um die Ecke. Und zwar ist es mal keine Karte, sondern Schachteln. Das mache ich ja sonst nicht so oft, aber bei den zwei Süßen konnte ich einfach nicht widerstehen. Sind die nicht knuffig? Sie sind recht einfach zu machen und es lassen sich Kleinigkeiten in die Schachteln hinein tun. So hat man relativ schnell ein kleines Geschenk hübsch dekoriert.

Hello, dears, today I have something sweet for you. And for once it's not a card, but boxes. I don't usually do this so often, but with these two sweethearts I just couldn't resist. Aren't they cute? They are quite easy to make and you can put little things into the boxes. So you can decorate a small gift pretty quickly.
 

Ich habe weißen Karton und Designpapier verwendet. So kann man auch mal die vielen Schnipsel verwenden, die man so angesammelt hat. An den Rändern habe ich hier und da noch mit Copics Schatten und auf die Nasen Strukturen gemalt.

I used white cardboard and design paper. So you can use the many pieces of paper that you have collected over the years. At the edges I painted shadows here and there with Copics and on the noses I added lines for the structures.


Materialliste
Supplies
Stanzen / dies: Sizzix 664511 Box Snowman
Copics


An den folgenden Challenges möchte ich mit meiner Karte teilnehmen.
I would like to participate into the following challenges with my card.
I really fell in love with those two cuties fro the moment I saw the die. Usually I do not make boxes so often, but they touched my heart and it is so nice to make little cute boxes and surprise someone with them.

Freitag, 9. Oktober 2020

You cannot turn back the clock

 *** Dieser Post enthält Werbung. ***

*** This post contains advertisement. ***

Du kannst die Uhr nicht zurück drehen und die Vergangenheit verändern. So ist es einfach und es ist - so finde ich - auch müßig, sich darüber Gedanken zu machen über "was wäre gewesen, wenn..." Denn wer weiß, ob es dann doch nicht wieder anders gekommen wäre. 
Mit dieser Einstellung bin ich immer gut durch das Leben gekommen. Es hat mir sehr geholfen, Entscheidungen zu treffen. In diesem Moment, in dieser Situation, in dieser Stimmung und zu dieser Zeit hat man seine Entscheidung getroffen. Und das ist gut so. Das Schicksal tut seinen Teil dazu.  Niemals kommt diese Situation wieder. Es geht darum, dass man zu seiner Entscheidung steht und weiter macht. Blick nicht zurück, sondern genieß den Moment und schau nach vorn. Ist es anders für Dich bestimmt, so wird Dir wieder etwas begegnen, jemand begegnen, etwas passieren...
 
You cannot turn back the clock and change the past. That's the way it is, and I think it's also pointless to think about "what would have happened if...". Because who knows if things would have turned out differently again.
With this attitude I managed my life well so far. It has helped me a lot to take decisions. In this moment, in this situation, with this mood and at this point in time you made your decision. And that is good. Fate contributes its part.  This situation will never come back. It is about standing by your decision and moving on. Do not look back, but enjoy the moment and look ahead. If it is intended differently for you, something will happen to you again, someone will meet you, something will happen...


Für diese Kollage habe ich eine spezielle Technik verwendet, mit der man einen Alkohol Ink Hintergrund von Yupo Papier auf ein normales Papier übertragen kann. Ich habe sie kürzlich für Euch genauer beschrieben (HIER). Man benutzt Alkohol Lift Ink Reinker. Von diesem gibt man ein paar Tropfen auf den HIntergrund, verteilt sie mit dem Brayer, legt ein Papier drüber und streicht es mit der Hand glatt. 
 
Das Wunderbare daran ist, dass man so auf dem "normalen Papier" wunderbar stempeln und embossen kann. Auf den drei Fotos könnt Ihr es gut erkennen: 1. Alkohol Ink Hintergrund auf Yupo Papier, 2. Transfer auf normales Papier, 3. bestempelter Hintergrund
 
For this collage I used a special technique to transfer an alcohol ink background from Yupo paper to normal paper. I recently described it in more detail for you (HERE). You use Alcohol Lift Ink Reinker. From this you put some drops on the background, spread them with a brayer, put a paper over it and smooth it with your hand.
 
The wonderful thing is that you can stamp and emboss on the "normal paper" this way. On the three photos you can see it well: 1. alcohol ink background on Yupo paper, 2. transfer on normal paper, 3. stamped background

 
Auf den Hintergrund habe ich durch die Fischnetz Schablone farblose Embossingpaste aufgetragen. Als sie schon in der Konsistenz fest, aber noch nicht ganz getrocknet war, habe ich Perfect Pearls in gold aufgetragen. So kann man durch die Struktur zwar durch sehen, aber sie schimmert schön golden. 
Außerdem habe ich noch Nuvo Drop Perlen zugefügt. 


On the background I applied colorless embossing paste through the ripped fishnet stencil. When it was firm in consistency but not yet completely dry, I applied Perfect Pearls in gold. So you can see through the structure, but it has a nice golden shimmer.
I also added Nuvo Drop pearls. 

Die Motte habe ich mit Ink on 3 gestempelt und dann von Hand mit einer Schere ausgeschnitten. Anschließend habe ich sie mit Copics koloriert. Ich habe ihr eine dreidimensionale Struktur gegeben und sie dann mit Abstandspads auf den Hintergrund geklebt. 

Die Ecken meiner Karte und der Grundkarte habe ich abgerundet und um den Spruch Bast geknotet.

I stamped the moth with Ink on 3 and fuzzy cut it. I then coloured it with Copics. I shaped it and glued it to the background with distance pads. 

 I rounded off the corners of my card and the base and knotted some bast around the text. 


Materialliste
Supplies


Stempel / stamps: Visible Image Somewhere in time, Glimmer of light 
 

Stempelkissen / stamp pads: Ink in 3; Distress Oxides wild honey, brushed corduroy, aged mahogany
Schablonen / stencils: Visible Image Ripped fishnet


Copics E53, E19, E97, YR14, R11, R22, R46, R59
Alcohol Ink Ranger cranberry, sunset orange, lemonade
Alcohol Lift Ink Refiller
Perfect Pearls sunflower sparkle
Nuvo Crystal Drops Metallic auburn pearl
Ssakura 08
Polychromos 101, 177, 199 
Dreamweaver Embossing paste translucent


An den folgenden Challenges möchte ich mit meiner Karte teilnehmen.
I would like to participate into the following challenges with my card.